
Lawn
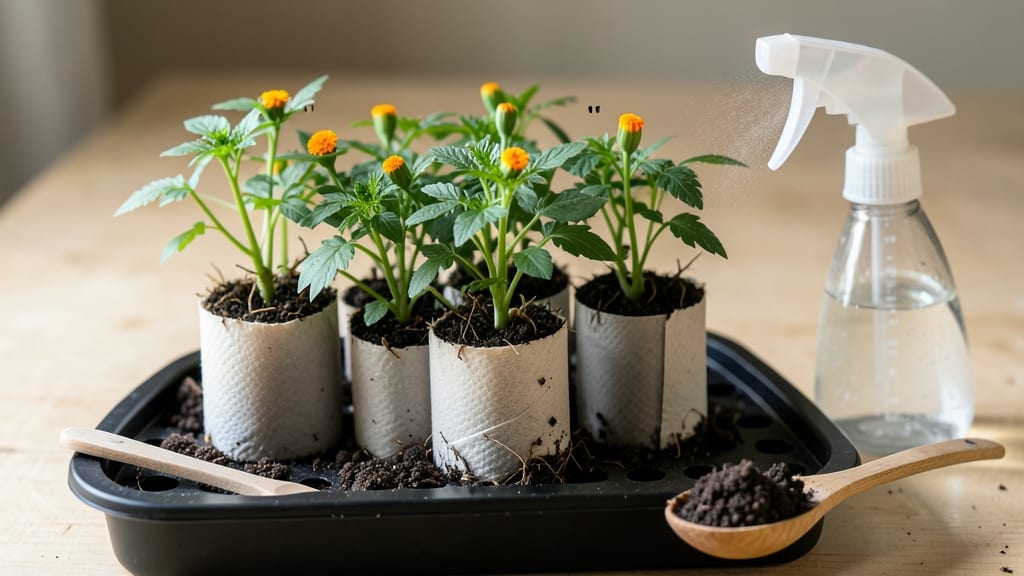
Turn this toilet paper roll seed starter into a fast, zero-waste seed-starting system that cuts germination time in half. 🌱 I’ve used this trick for three seasons now, and it’s saved me money while reducing household waste—my basil and peppers sprout within a week instead of the usual two.
The beauty of this method is its simplicity: no fancy supplies, just rolls, soil, and a sunny windowsill. You’ll need empty rolls (cleaned, of course), potting mix, seeds, and a spray bottle for gentle watering.
It’s perfect for beginners or anyone short on space—even my black thumb can’t kill these starters. By the time your seedlings are ready to transplant, they’ll be stocky and ready for the garden. The roots grow strong in the rolls, making the transition to pots or soil seamless.
Plus, you’ll feel great knowing you’re repurposing something that would otherwise end up in the trash. This works for almost any small seed—herbs, lettuce, tomatoes, and even flowers like marigolds. Just avoid large seeds like beans or squash, which need deeper soil. Let’s get those sprouts growing!
📚 In This Guide
- What you need
- Instructions
- Tips and common mistakes
- Wrapping up and next steps
What you need
- ● Empty toilet paper rolls: 1–10 (depending on how many seeds you’re starting; standard 4.5-inch diameter works best).
- ● Potting soil: 1–2 cups of light, well-draining seed-starting mix (avoid garden soil—it’s too dense!).
- ● Seeds: Fast-growing varieties like basil, lettuce, radishes, or marigolds (check seed packets for depth requirements).
- ● Water: A spray bottle or small watering can (gentle moisture is key!).
- ● Scissors or knife: To trim rolls if needed (e.g., for wider seeds like beans).
- ○ Plastic wrap or damp paper towels: Optional but helpful for humidity-loving seeds (like tomatoes).
- ● Biodegradable mesh or coffee filters: Place at the bottom of rolls to prevent soil leakage.
- ● Plant labels or toothpicks: Mark rolls with seed types if starting multiple varieties.
- ● Clear plastic bags: Create mini greenhouses by sealing rolls in them (great for slow starters!).
- ● Compost or worm castings: Mix a spoonful into soil for extra nutrients.
Step-by-Step instructions for toilet paper roll seed starters
Here’s how to turn empty rolls into a zero-waste, fast-growing seed starter system that works for almost any tiny seed.
🌱 Step 1: Prep the Rolls and Fill with Soil
Start by cutting the toilet paper rolls into 3-inch sections—this gives roots room to grow without getting tangled. I like to stack them vertically in a shallow tray or container to keep things tidy. Fill each roll about ¾ full with your seed-starting mix, pressing gently so it stays in place but doesn’t pack down too tightly.
Moisten the soil lightly with a spray bottle until it’s damp but not soggy. You’ll know it’s right when a handful squeezes out just a few drops of water—no puddles. This ensures seeds get consistent moisture without drowning.
🌱 Step 2: Plant Seeds and Label for Tracking
Follow the seed packet’s depth guidelines—usually twice the seed’s diameter. I tap the seed packet gently to release one seed at a time into each roll, then cover it with a thin layer of soil. For tiny seeds like lettuce or carrots, I use a toothpick to press them lightly into the soil without burying them too deep.
Label each roll immediately with the seed type and date using a marker or a small piece of tape. Trust me, after a week of identical green sprouts, you’ll forget which is which. Place the tray somewhere warm—70-75°F is ideal for most seeds—to speed up germination.
💧 Step 3: Water and Provide Humidity for Germination
Mist the soil surface lightly every 1-2 days until you see sprouts. The key is to keep the soil consistently moist but not waterlogged—overwatering here is the fastest way to invite mold. If condensation forms on the tray, lift the rolls slightly to let air circulate and prevent damping-off.
For faster germination, cover the tray with clear plastic wrap or a humidity dome. This traps warmth and moisture, which is especially helpful in dry climates. You’ll see the first tiny green shoots in as little as 3-7 days, depending on the seed type.
☀️ Step 4: Move to Light and Care for Seedlings
Once sprouts appear, remove the plastic and place the rolls under bright, indirect light—a south-facing window or a grow light works best. Seedlings need 12-14 hours of light daily to avoid becoming leggy. If you notice stems stretching toward the light, move the rolls closer or add a grow light.
Water from the bottom by placing the tray in ½ inch of water for 10-15 minutes—this encourages roots to grow downward. After a week, you’ll see the first true leaves (not the initial seed leaves) emerge. This is your cue to start fertilizing lightly with a diluted liquid fertilizer every 2-3 weeks.
🪴 Step 5: Transplant When Ready
Seedlings are ready to transplant when they’ve developed 2-3 sets of true leaves and the roots are growing out the bottom of the rolls. Gently squeeze the sides of the roll to loosen the root ball, then slide the seedling (still in its roll) into the soil. The roll will break down naturally over time, so you don’t need to remove it.
Water deeply after transplanting to help the roots settle. If you’re moving them outdoors, harden them off by placing them in a shaded spot for 1-2 hours daily over 5-7 days before full sun exposure. This prevents shock and ensures they thrive in their new home.
Tips & tricks for perfect toilet paper roll seed starters
Here's what nobody tells you about making these little seed starters work like a dream—no green thumb required.
Roll Size Matters: Those 3-inch sections are perfect for most tiny seeds, but for larger seeds like beans or peas, you might want to use the full 6-inch roll length. The extra space gives roots room to spread without becoming root-bound, which can stunt growth. For delicate seeds like lettuce or herbs, stick with the 3-inch sections—they’ll germinate faster in the smaller space.
Soil Moisture Secret: In Step 1, when you're moistening the soil, think "squeeze test" rather than eyeballing it. The soil should hold together when you gently squeeze it but still crumble easily. If it sticks together like wet sand, it's too wet; if it falls apart completely, it needs more moisture. This balance is critical for preventing both mold and dry-out during germination.
Lighting Hack: For Step 4, if you don't have a south-facing window, a simple LED desk lamp with a white bulb can work in a pinch. Place it about 6 inches above the seedlings and leave it on for the full 12-14 hours daily. The key is consistent light—seedlings will stretch toward any light source, so rotate the tray daily for even growth. I've even used grocery store produce lights for this purpose when starting a big batch.
Transplanting Pro Tip: When you're ready to transplant in Step 5, give the rolls a quick soak in water for about 5 minutes before sliding them into the soil. This helps loosen the root ball and prevents transplant shock. The toilet paper will break down naturally, but if you're worried about it, you can tear it away gently after a few weeks once the roots have established themselves in the new soil.
Pro Tips for Toilet Paper Roll Seed Starter
- Here's what nobody tells you about making these little seed starters work like a dream—no green thumb required.
- Roll Size Matters: Those 3-inch sections are perfect for most tiny seeds, but for larger seeds like beans or peas, you might want to use the full 6-inch roll length.
- Soil Moisture Secret: In Step 1, when you're moistening the soil, think "squeeze test" rather than eyeballing it.
Frequently asked questions
Got questions?
Here are answers to the most common ones about using toilet paper roll seed starters—because every gardener deserves a little clarity!
Why use toilet paper rolls instead of regular seed starter pots?
Toilet paper rolls are perfect for seed starters because they’re lightweight, biodegradable, and hold moisture well. Unlike plastic pots, they break down naturally when transplanted, reducing waste. Plus, they’re free and easy to find!
How long does it take for seeds to germinate in a toilet paper roll?
Germination time varies by seed type, but most seeds sprout in 5–14 days with proper moisture and warmth. Keep rolls in a sunny spot (or under grow lights) and check daily for sprouts. Pro tip: Mist rolls lightly instead of soaking to avoid mold!
Can I reuse toilet paper rolls for multiple seed batches?
Yes! Clean and dry rolls between uses to prevent mold or bacteria. For extra hygiene, line them with a fresh coffee filter or paper towel. Just avoid rolls with ink (some contain chemicals that may harm seeds). Bonus: Recycle used rolls for compost!
What do I do if my seeds aren’t sprouting?
First, check moisture—seeds need consistent dampness (not soggy). If they’re dry, gently water and place rolls in a warm spot. After 2 weeks, test viability by planting a few seeds directly in soil. Some seeds (like tomatoes) need light to germinate—try pressing them lightly into the roll’s top.
Are there alternatives to toilet paper rolls for seed starters?
Try:
- Newspaper or junk mail (cut into strips, rolled tightly)
- Egg cartons (biodegradable and sturdy)
- Muffin tins (reusable for multiple batches)
- Coconut coir pots (eco-friendly and sturdy)
Wrapping up and next steps
Transforming toilet paper rolls into seed starters is a brilliant way to grow your garden sustainably while reducing waste—no fancy tools or big budget required! 🌱 Whether you’re a beginner or a seasoned gardener, this method makes sprouting seeds faster, easier, and eco-friendly.
Now that you’re armed with the know-how, why not start small? Grab a roll, pick your favorite seeds, and give it a try—your future plants (and the planet) will thank you!
Next steps:
- Experiment with herbs, flowers, or veggies to see what thrives best.
- Share your progress with fellow gardeners for tips and inspiration!
- Try scaling up with cardboard egg cartons or biodegradable pots next.