
Lawn
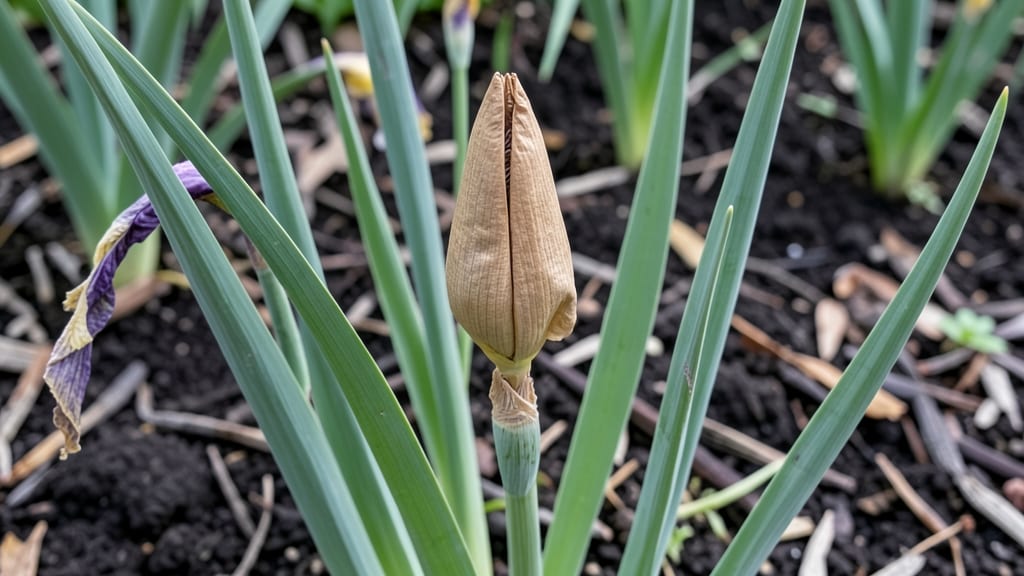
Those iris flower seed pods hold the secret to growing your own irises—but only if you dry them right. 🌱 I learned the hard way that fresh pods won’t sprout, while properly dried seeds break dormancy like magic. The trick? Timing, airflow, and patience to unlock reliable germination.
First, collect pods when they turn brown and papery, usually late summer to early fall. Hang them upside-down in a shady, dry spot for 4-6 weeks—this mimics nature’s drying process.
Avoid plastic bags (they trap moisture), and check weekly for mold. Once fully dry, the pods will rattle like tiny maracas when shaken.
With dried seeds, germination takes 3-6 months in cool conditions (60-65°F). Plant them shallowly in well-draining soil and keep them barely moist. Most irises won’t sprout until the second year, but the wait pays off with vibrant, hardy plants that multiply naturally.
For faster results, skip seeds entirely and divide rhizomes in early spring—it’s the foolproof way to get irises growing. But if you’re hooked on the seed method, these drying secrets turn unreliable pods into a rewarding long-term project.
📚 In This Guide
- What you need
- Instructions
- Tips and common mistakes
- Wrapping up and next steps
What you need
- ● Mature iris seed pods: Collect fully browned, dry pods (late summer/early fall). Aim for 10–20 pods depending on your storage goals.
- ● Pruning shears or sharp scissors: For cleanly harvesting pods without damaging stems.
- ● Paper bags (brown kraft or breathable fabric bags): 2–4 bags (one per pod or a few pods per bag). Avoid plastic—it traps moisture!
- ● Labeling tags & permanent marker: To note pod collection dates and iris varieties.
- ● Drying location: A cool, dark, well-ventilated spot (e.g., garage shelf, basement, or shaded porch). Avoid direct sunlight or humidity.
- ● Desiccant packets (silica gel): Place 1–2 in bags to absorb excess moisture if humidity is high.
- ● Glass jars with lids: For long-term storage after pods are fully dried (seal tightly once dry).
- ● Fine mesh screen or cheesecloth: To sift and separate seeds from dried pods if needed.
- ● Humidity monitor: Ideal for tracking conditions (aim for 30–50% humidity).
Step-by-Step guide to harvesting and drying iris seed pods
Here's how I transform iris seed pods into reliable, year-round planting material—no guesswork involved.
🌿 Step 1: Identify and Harvest Mature Seed Pods
Wait until the seed pods turn from green to a papery brown color before harvesting—this signals full maturity. Iris pods often split open when overripe, so check them weekly in late summer. Use clean, sharp pruning shears to snip the entire pod from the stalk, leaving about ½ inch of stem attached. This connection helps prevent moisture loss during drying.
Harvest on a dry morning after dew has evaporated. Wet pods take longer to dry properly and risk mold development. Place the freshly cut pods in a paper bag or open mesh container to prevent bruising. I always label each pod with the iris variety and harvest date—some iris types have germination quirks you’ll want to track.
💧 Step 2: Pre-Dry Pods for Optimal Seed Viability
Spread the harvested pods in a single layer on a clean, dry surface in a well-ventilated area. Choose a spot with indirect sunlight and 60-70°F temperatures—direct sun can scorch the pods while poor airflow encourages mold. I use a wooden tray lined with paper towels to catch any moisture that might leak from the pods.
Leave the pods undisturbed for 3-5 days, checking daily for signs of moisture. You’ll know they’re ready for the next step when the outer casing feels dry to the touch but hasn’t yet begun to crack open. If you notice any pods developing fuzzy mold, isolate them immediately and discard—this is your warning that humidity was too high.
☀️ Step 3: Complete Drying Under Controlled Conditions
Transfer the pre-dried pods to a dark, dry location with consistent airflow, such as a seed storage box with ventilation holes or a mesh bag hung in a closet. Maintain 50-60% humidity and 65-75°F temperatures for optimal results. I place a small silica gel packet in the storage container to absorb excess moisture—this prevents the pods from becoming damp again.
Allow the pods to dry for an additional 2-3 weeks until they rattle when shaken gently. This sound indicates the seeds inside are completely dehydrated and ready for storage. If you’re impatient, you can speed up drying by placing the pods in a single layer on a cooling rack in a dry area, but avoid heat sources like radiators.
⏰ Step 4: Extract and Store Seeds Properly
Once fully dried, gently squeeze the pods to release the seeds. Iris seeds are tiny and flat, often resembling small, dark brown beads. Spread them on a clean surface and examine for any remaining moisture or debris. I use a fine mesh strainer to separate seeds from chaff, then transfer them to a small envelope labeled with the iris variety and harvest date.
Store the seeds in an airtight container with a desiccant packet in a cool, dark place. Iris seeds remain viable for 1-2 years when stored properly, but I’ve found germination rates peak when planted within the first year. For best results, plant them in fall—this mimics their natural dormancy period and improves germination success.
Tips & tricks for perfect iris seed pod drying
Mastering iris seed pod drying takes patience, but these insights will help you avoid common pitfalls and maximize germination success.
Timing Secret: In Step 1, when harvesting, focus on that papery brown color—it’s your clearest indicator of maturity. I’ve learned the hard way that harvesting too early (when pods are still green) results in seeds that won’t germinate properly. The ½-inch stem attachment is crucial too—it acts as a natural moisture barrier during the early drying stages, preventing the pods from absorbing humidity from the air.
Environmental Control: The 60-70°F temperature range during pre-drying (Step 2) is non-negotiable for optimal seed viability. I’ve seen pods develop mold when left in cooler, damp conditions—this is your warning sign that humidity levels are too high. If your space tends to be humid, consider placing a small fan nearby to create gentle airflow without disturbing the pods. The goal is to mimic natural drying conditions while preventing fungal growth.
Visual Cues for Doneness: In Step 3, when pods should rattle after 2-3 weeks, listen for that distinctive sound—it’s your confirmation that seeds are fully dehydrated. I’ve found that pods dried in dark locations develop a slightly darker brown hue, while those exposed to even indirect light may appear lighter. This color change is subtle but noticeable when comparing properly dried pods to those that need more time.
Storage Wisdom: The 1-2 year viability window for stored seeds is why I always label my containers with both the iris variety and harvest date. Some iris types, like the Siberian iris, maintain viability longer than others, so tracking this information prevents disappointment when germination rates drop unexpectedly. A desiccant packet isn’t just optional—it’s essential for maintaining that 50-60% humidity level during long-term storage.
Pro Tips for Iris Flower Seed Pod
- Mastering iris seed pod drying takes patience, but these insights will help you avoid common pitfalls and maximize ge...
- Timing Secret: In Step 1, when harvesting, focus on that papery brown color—it’s your clearest indicator of maturity....
- Environmental Control: The 60-70°F temperature range during pre-drying (Step 2) is non-negotiable for optimal seed vi...
Frequently asked questions
Got questions about harvesting, drying, or growing iris flower seed pods? You’re not alone! Here are some of the most common queries—and their straightforward answers—to help you master the process for reliable year-round sprouts.
How do I know when iris seed pods are fully ripe for harvesting?
Harvest iris seed pods when they turn a light brown and feel crispy to the touch (like dried paper). If they’re still green or soft, they need more time—usually 4–6 weeks after flowering. Avoid harvesting if pods are splitting open naturally, as seeds may have already dispersed!
What’s the best way to dry iris seed pods to prevent mold or rot?
Spread pods in a single layer on a mesh screen or paper towel in a well-ventilated, shady area (like a garage or shed). Avoid direct sunlight or humidity—aim for 1–2 weeks of drying. For extra protection, place a dehumidifier nearby or use a fan on low to circulate air.
Can I store iris seed pods in the fridge or freezer for long-term use?
Yes! Once fully dried, store pods in a sealed airtight container (like a glass jar or ziplock bag) with a silica gel packet to absorb moisture. Keep them in a cool, dark place (fridge or freezer works). Properly stored pods stay viable for 1–2 years—just label them with the harvest date!
What should I do if my iris seed pods won’t open naturally?
If pods stay closed, try one of these tricks:
- Freeze them overnight, then place in a warm, dry spot—the temperature shift can trigger opening.
- Gently tap the pods on a hard surface to loosen seeds.
- Cut open stubborn pods with sterilized scissors to extract seeds (wear gloves—some irises have irritating sap!).
Are there alternatives if I can’t grow iris from seed pods?
If seed pods fail, try:
- Rhizome division: Dig up mature iris clumps, separate the roots, and replant in spring or fall.
- Buy nursery-grown plants: Look for bare-root irises in early spring for guaranteed blooms.
- Layering: Bend a healthy stem to the ground, weigh it down, and let it root before separating.
Still stumped? Drop your question in the comments—we’re happy to help you grow those dreamy iris blooms!
Wrapping up and next steps
Growing iris seed pods into thriving plants is all about patience, precision, and a little green thumb love! 🌱 By mastering the drying process—whether through air-drying, oven methods, or even cold stratification—you’re setting the stage for reliable, year-round sprouts.
Remember, consistency is key, and soon, your garden will bloom with vibrant irises that’ll make your neighbors green with envy.
Ready to take the next step? Start small—try drying a few pods this season, experiment with techniques, and track your success. Before you know it, you’ll be a pro, sharing your iris-growing secrets with fellow gardening enthusiasts! 🌸