
Lawn
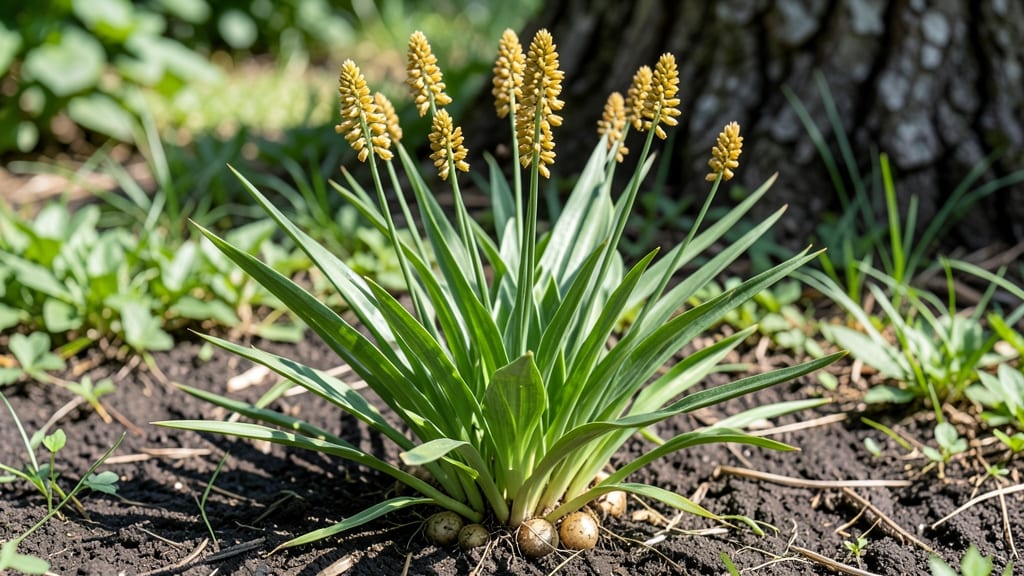
That stubborn yellow nutsedge seed head popping up in your lawn is basically nature’s way of saying, "I’m back—deal with it." 🌱 The problem isn’t just the seed heads; it’s the underground tubers that multiply faster than weeds in a summer storm.
But here’s the good news: you can outsmart it without twisting your back (or your patience) trying to yank it out.
First, grab a trowel, some gloves, and a sharp knife—no fancy tools needed. The trick is to cut the seed head off at ground level before it drops seeds, then dig out those sneaky tubers while they’re still small.
Water management is key too: nutsedge thrives in soggy soil, so let your lawn dry out between waterings. Mulching helps smother new growth, but don’t pack it too tight—you still need to check for regrowth.
You’ll see results fast if you’re consistent: fewer seed heads by midseason, and tubers won’t spread as aggressively. The real win? A lawn that looks like it belongs in a postcard, not a weed’s paradise.
Just don’t skip the follow-up checks—those tubers are patient, and they’ll wait for you to slip up.
For stubborn patches, a targeted herbicide (like glyphosate) works, but organic options like vinegar spray or corn gluten meal can help too—just be ready to repeat the process. The goal isn’t perfection; it’s control. And once you’ve got the rhythm, nutsedge won’t stand a chance.
📚 In This Guide
- What you need
- Instructions
- Tips and common mistakes
- Wrapping up and next steps
What you need
- ● Garden gloves: Heavy-duty, chemical-resistant (1 pair) – for protection against sharp edges and potential irritants.
- ● Pruning shears or hedge clippers: Sharp, bypass-style (1 pair) – ideal for clean cuts without crushing stems.
- ● Garden fork or trowel: Sturdy, with a narrow head (1) – for loosening stubborn nutsedge roots.
- ● Trash bags or compost bin: Heavy-duty (1-2 bags) – to dispose of cuttings and debris.
- ● Hose with nozzle: Adjustable spray (1) – for rinsing tools and hands post-removal.
- ○ Pre-emergent herbicide (optional but recommended): Product like pendimethalin or prodiamine (1-2 gallons, follow label rates) – for preventing regrowth.
- ● Labelled containers: Small spray bottles (2-3) – for mixing herbicide solutions if spot-treating.
- ● Handheld weed puller: Ergonomic design (1) – speeds up removal of deep-rooted nutsedge.
- ● Knee pads: Gel-cushioned (1 pair) – for comfort during prolonged kneeling.
- ● Solar-powered grass trimmer: With adjustable height (1) – for mowing around treated areas.
- ● Natural vinegar solution (1:1 ratio with water): (1 gallon) – as an eco-friendly alternative for spot treatment.
- ● Notebook & pen: (1) – to track treated areas and follow-up dates.
How to remove yellow nutsedge seed heads without twisting
Here's my foolproof method for eliminating nutsedge seed heads cleanly—no stubborn twisting or regrowth.
🌱 Step 1: Identify and Time Your Removal
Yellow nutsedge produces distinctive seed heads that look like tiny yellow corn cobs. The key is removing them before they mature—when they're still pale green and fuzzy, about 3-4 inches tall. Mature seed heads turn golden-brown and release thousands of seeds that sprout aggressively. I grab a pair of gloves first—nutsedge sap can irritate skin.
Timing matters most: If you wait until the seed heads are fully formed, you'll be fighting a losing battle. The ideal moment is when they're half-developed but still pliable. You'll know it's time when the seed head feels slightly soft when squeezed between your fingers—like a ripe pea pod rather than a dried husk.
✂️ Step 2: Use the Right Cutting Technique
Grab a sharp pair of pruning shears or a clean knife. The twist-free method starts with a clean, straight cut at the base of the seed head, about 1/4 inch above the soil line. I angle the blade slightly downward to avoid damaging surrounding grass. Never yank or pull—the seed head will snap off unevenly, leaving stubborn roots behind.
For stubborn seed heads, I make a second cut 1/8 inch deeper—this ensures the entire seed stalk is removed without breaking. If you leave even a tiny piece of root, new seed heads will sprout from that spot within weeks. I always cut during dry weather so the soil isn't muddy—wet conditions make clean cuts nearly impossible.
💧 Step 3: Prevent Regrowth with Post-Removal Care
After removal, water the area lightly to help the lawn recover. I've found that applying a 2-3 inch layer of mulch (like shredded bark) around the cut area suppresses any remaining roots. For severe infestations, I spot-treat with a vinegar solution (1 gallon white vinegar + 1 cup dish soap) applied directly to the cut stump. This kills residual root tissue without harming nearby grass.
Here's the thing—nutsedge thrives in moist soil, so improving drainage helps long-term. If your lawn holds water after rain, consider aerating or adding sand to the soil mix. I test moisture by pressing my finger into the soil: if it stays damp for more than a few hours, that's nutsedge heaven. Aim for soil that feels like a wrung-out sponge—damp but not soggy.
☀️ Step 4: Monitor and Repeat Weekly
New seed heads appear every 7-10 days during peak growing season (late spring to early fall). I set a calendar reminder to check the same spots weekly—consistency is the secret weapon. Mark treated areas with small flags or stones so you don't miss them during routine mowing.
Watch for regrowth at the cut site: if you see tiny yellow shoots emerging, it means you didn't remove enough of the root. In that case, dig carefully with a trowel to expose the entire root system—nutsedge roots can run 2-3 feet deep in some cases. I use a garden fork to gently loosen the soil around the base before pulling.
🪴 Step 5: Strengthen Your Lawn's Defense
Healthy grass crowds out nutsedge naturally. I overseed bare patches with dense-growing grasses like zoysia or buffalo grass, which shade out nutsedge seedlings. For existing lawns, I apply a slow-release nitrogen fertilizer in early spring to encourage thick growth. Thick turf means fewer gaps for nutsedge to invade.
Don't forget about cultural controls: mow high (3-4 inches for most grasses) to shade the soil and reduce seed head production. I adjust my mower height in late summer when nutsedge growth peaks—taller grass blocks sunlight that nutsedge needs to germinate. If all else fails, solarization (covering the area with clear plastic for 4-6 weeks** in summer) kills nutsedge roots through heat buildup.
Tips & tricks for perfect nutsedge removal
Real talk: I've spent years battling these stubborn weeds, and these tricks make all the difference between temporary relief and permanent control.
Timing Secret: The 3-4 inch height guideline is non-negotiable—waiting until they're fully mature means you'll be fighting thousands of new seeds next season. I check seed heads every 3 days during peak season (late spring to early fall) to catch them at that perfect half-developed stage. The softness test (squeezing like a ripe pea pod) is your best friend—it's the only reliable way to judge readiness without guessing.
Cutting Precision: That 1/4 inch above soil line measurement is critical—any lower and you risk damaging grass roots, any higher and you leave root fragments that regrow. I mark my cutting line with a small flag or stone to avoid eyeing it every time. For stubborn seed heads, the second cut at 1/8 inch deeper is where most people fail—they think one clean cut is enough, but nutsedge roots are sneaky. I always test the depth by wiggling the remaining stalk—if it moves at all, go deeper.
Post-Removal Strategy: The 2-3 inch mulch layer is your insurance policy against regrowth. I use shredded hardwood mulch because it breaks down slowly and suppresses weeds naturally. For the vinegar solution (1 gallon vinegar + 1 cup dish soap), I apply it with a spray bottle directly to the cut stump—this kills any remaining root tissue without harming surrounding grass. The key is consistency: I treat every cut stump immediately after removal, even if it seems like overkill.
Monitoring System: Setting that weekly calendar reminder is what separates one-time success from long-term control. I use colorful flags to mark treated areas—red for newly cut, yellow for areas needing follow-up. During peak season, I check these spots every 7 days without fail. The regrowth test (looking for tiny yellow shoots) is your early warning system—if you see them, it means you need to dig deeper and expose the entire root system with a trowel.
Pro Tips for Yellow Nutsedge Seed Head
- Real talk: I've spent years battling these stubborn weeds, and these tricks make all the difference between temporary...
- Timing Secret: The 3-4 inch height guideline is non-negotiable—waiting until they're fully mature means you'll be fig...
- Cutting Precision: That 1/4 inch above soil line measurement is critical—any lower and you risk damaging grass roots,...
Frequently asked questions
Got questions about managing yellow nutsedge seed heads? You’re not alone—this pesky weed can be tricky! Here are some of the most common concerns and straightforward answers to help you tackle it like a pro.
Why do yellow nutsedge seed heads twist when I try to pull them?
Yellow nutsedge seed heads twist because of their unique nutlet structure—small, hard seed pods that form a tight spiral. This design helps them burrow into soil, making manual removal frustrating. Always twist counterclockwise (if looking from above) to break the seed head free without leaving stubborn roots behind.
When is the best time to remove yellow nutsedge seed heads?
The ideal window is late summer to early fall (August–October in most regions). Seed heads are fully mature but haven’t yet released seeds, so you can prevent next year’s infestation. Avoid spring—this is when nutsedge germinates aggressively, and you’ll likely disturb new shoots.
What’s the best alternative if twisting doesn’t work?
If seed heads keep twisting off or breaking, try these low-toxicity methods:
- Solarization: Cover the area with clear plastic for 4–6 weeks in hot weather to kill nutsedge roots.
- Corn gluten meal: Apply as a pre-emergent (spring/fall) to block seed germination.
- Spot-treat with vinegar: A 20% vinegar-water solution (reapply weekly) for small patches.
For large lawns, consider selective herbicides like halosulfuron (follow label instructions!).
Will cutting yellow nutsedge seed heads help control it?
No—never mow or cut seed heads! This spreads the nutlets, worsening the problem. Always remove the entire seed head by hand (or with tools) and dispose of it in the trash not the compost. Think of it like weed surgery: precision matters!
How do I keep yellow nutsedge from coming back after removal?
Prevention is key! Focus on:
- Improve drainage: Nutsedge thrives in soggy soil—fix waterlogged areas with sand or gravel.
- Compete with grass: Overseed thin lawns with tall fescue or ryegrass to crowd out weeds.
- Mulch beds: A 2–3 inch layer of wood chips blocks light, stopping nutsedge germination.
Stay vigilant—check for new shoots weekly during warm months!
Wrapping up and next steps
Mastering the removal of yellow nutsedge seed heads is your first step toward a healthier, weed-free lawn! 🌱 With the right tools—like a sharp knife, gloves, and a little patience—you can tackle this stubborn invader without twisting or breaking the seed head.
Remember, consistency is key: early action prevents regrowth, so stay vigilant during warm months.
Ready to reclaim your lawn? Start by inspecting and treating small patches first, then expand your efforts. Share your progress with fellow gardeners—you’ve got this! 💪 For extra help, explore local lawn care resources or join gardening forums to swap tips.