
Planting
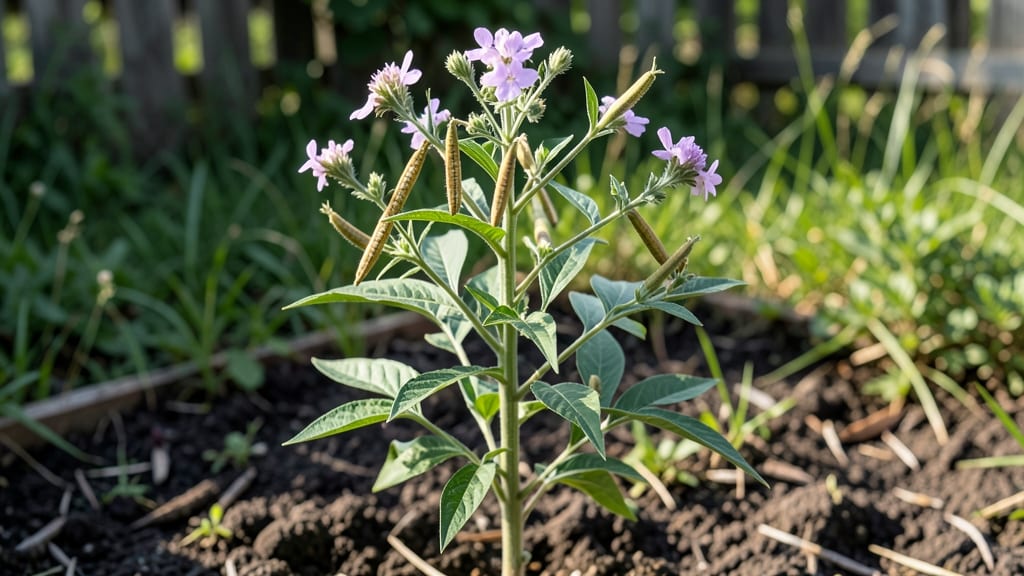
Growing sesame seed plants for viable seeds is easier than you think—no greenhouse or special equipment needed. ✨ I’ve grown sesames in my backyard for three years now, and the key is patience and the right timing.
These drought-tolerant plants thrive with minimal fuss once you get the basics right, producing those tiny white seeds we all love.
The secret lies in well-draining soil and full sun—sesames hate soggy roots but love heat. Plant seeds ½ inch deep in warm soil (70°F or warmer) after your last frost, spacing them 12 inches apart.
Water lightly at first, then let the soil dry between waterings. They’re tough little plants that bounce back from neglect, but consistent warmth is non-negotiable.
By late summer, you’ll see those iconic white flowers give way to seed pods. Harvest when the pods turn brown and brittle—usually around 100 days after planting. Rub the pods between your hands to release the seeds, then dry them completely before storing.
A single plant yields enough seeds to replant or share with neighbors.
Sesames are versatile: grow them as an ornamental for their delicate blooms or for culinary use. They’re perfect for small spaces, containers, or even as a cover crop. The only challenge? Waiting for those tiny seeds to mature—it’s worth every day of the process.
📚 In This Guide
- What you need
- Instructions
- Tips and common mistakes
- Wrapping up and next steps
What you need
- ● Sesame Seeds: Purchase organic, non-GMO sesame seeds (e.g., Sesamum indicum) from a trusted seed supplier. Aim for 1–2 lbs (450–900g) per 100 sq. ft. of planting space.
- ● High-Quality Soil: Use a well-draining potting mix or garden soil amended with compost (50% soil, 50% compost). Sesame plants thrive in sandy loam with a pH of 6.0–7.0.
- ● Containers or Garden Bed: Containers: 5–7 gallon pots (1–2 plants per pot) with drainage holes.
- ● Garden Bed: 100–200 sq. ft. of open, sunny space (full sun, 6+ hours/day).
- ● Fertilizer: Balanced Organic Fertilizer: 5-5-5 or 10-10-10 (e.g., fish emulsion or compost tea) at planting and mid-growth.
- ○ Phosphorus Boost (Optional): Bone meal (1 tbsp per plant) at planting for root development.
- ● Watering Supplies: Watering Can or Hose: With a gentle spray nozzle to avoid disturbing seedlings.
- ○ Drip Irrigation (Optional): For consistent moisture in larger plots.
- ● Planting Tools: Hand Trowel or Seedling Trays (for starting indoors).
- ● Gloves (to protect hands from soil and seeds).
- ● Mulch: Straw or Wood Chips (1–2 inches) to retain moisture and suppress weeds.
- ● Grow Lights: If starting indoors before the last frost (LED or fluorescent, 12–14 hours/day).
- ● Pest Control: Neem Oil Spray or Insecticidal Soap (for aphids/spider mites).
- ● Row Covers (to deter birds/insects early on).
- ● Pruning Shears: For trimming leggy plants or deadheading.
- ● Harvesting Tools: Sharp Scissors or Pruners (for clean cuts).
- ● Drying Rack or Mesh Bags (for seed drying).
- ● pH Test Kit: To monitor soil acidity (sesame is sensitive to alkaline conditions).
How to grow a sesame seed plant for reliable year-round harvests
Here's the straightforward method I use to grow healthy sesame plants that produce plentiful, viable seeds every season.
🌱 Step 1: Start Seeds Indoors for Strong Starts
Sesame seeds need warmth to germinate quickly, so I begin indoors 8-10 weeks before the last frost. Fill small pots with seed-starting mix and plant seeds ¼ inch deep, spacing them 1 inch apart. Keep the soil consistently moist but never soggy—sesame seedlings hate waterlogged roots.
Place the pots in a warm spot with 75-85°F soil temperatures. A seedling heat mat works wonders here. You'll see sprouts in 7-14 days, though germination can take longer if your home runs cooler. Once seedlings emerge, move them to a sunny windowsill or under grow lights for 12-14 hours daily.
☀️ Step 2: Transplant Outdoors When Soil Warms Up
Wait until soil temperatures reach at least 60°F before transplanting—sesame plants bolt (flower prematurely) in cool conditions. Harden off seedlings by placing them outside for 1-2 hours daily over 5-7 days, gradually increasing exposure.
Space plants 12-18 inches apart in well-draining soil with full sun exposure. Sesame thrives in loose, sandy loam but tolerates poorer soils. Water deeply at the base after transplanting to help roots establish. Watch for first true leaves—they should appear within 10-14 days of transplanting.
💧 Step 3: Maintain Consistent Water and Fertility
Sesame plants are drought-tolerant once established, but keep soil evenly moist during the first 4-6 weeks after transplanting. Water at the base in the morning to prevent fungal issues. Overhead watering can spread disease, especially in humid conditions.
Feed plants lightly with a balanced fertilizer (10-10-10) every 4-6 weeks to encourage steady growth. Too much nitrogen leads to lush foliage but fewer seed pods. You'll know fertility is right when plants grow 12-18 inches tall with sturdy stems and 5-7 inches between leaves.
✂️ Step 4: Harvest Seeds at Peak Ripeness
Watch for seed pods to turn brown and dry on the plant—this signals maturity. Harvest pods when they're fully dry but before they shatter. Cut entire stems and hang them upside down in a dry, well-ventilated space for 1-2 weeks to finish drying.
Once pods are completely brittle, rub them between your hands to release seeds. Store seeds in an airtight container in a cool, dark place. Properly dried seeds stay viable for 1-2 years. If pods shatter too easily, harvest earlier and finish drying indoors.
🌿 Step 5: Prevent Common Pitfalls for Better Yields
Sesame plants bolt quickly in cool weather, so avoid transplanting too early. If you notice stems elongating and flowering prematurely, move plants to a warmer location immediately. Mulch around the base to keep roots warm and retain moisture.
Watch for spider mites in dry conditions—they suck plant juices and weaken stems. Spray plants with water daily during hot spells to deter pests. If leaves yellow between veins, it's a sign of nutrient deficiency. Add a balanced fertilizer and monitor soil moisture, as overwatering can leach nutrients.
Tips & tricks for stress-free sesame seed planting
Between us, sesame plants reward patience—here's how to turn that patience into a bountiful harvest.
Warmth is Everything: Sesame seeds need that 75-85°F soil temperature for germination, but don't overheat them. I use a seedling heat mat set to 78°F—just warm enough to speed up sprouting without cooking the seeds. If your home runs cooler, consider a heated propagation mat or even a sunny windowsill with a clear plastic dome to trap heat.
Harden Off Gradually: During the 5-7 day hardening process in Step 2, I increase exposure time by 30 minutes each day. Start with just 1 hour on day 1, then 1.5 hours on day 2, and so on. This gradual approach prevents shock that could stunt growth—especially important since sesame plants are sensitive to temperature changes.
Sunlight Strategy: Sesame plants thrive in full sun, but if you're using grow lights, aim for 12-14 hours daily with lights positioned 6-12 inches above seedlings. I use LED grow lights on a timer to mimic summer sunlight. Once outdoors, ensure they get at least 6-8 hours of direct sun daily—partial shade can lead to weak stems and fewer pods.
Harvesting Hack: When pods turn brown but still feel slightly plump (not completely brittle), harvest them and finish drying indoors. I spread stems on a clean towel in a dry, well-ventilated area with a fan blowing gently. This controlled drying prevents seeds from scattering while ensuring maximum viability—critical for year-round planting.
Pro Tips for Seseme Seed Plant
- Between us, sesame plants reward patience—here's how to turn that patience into a bountiful harvest.
- Warmth is Everything: Sesame seeds need that 75-85°F soil temperature for germination, but don't overheat them.
- Harden Off Gradually: During the 5-7 day hardening process in Step 2, I increase exposure time by 30 minutes each day.
Frequently asked questions
Got questions about growing sesame seeds?
You’re not alone! Here are answers to the most common queries to help you cultivate a thriving sesame seed plant with confidence.
How long does it take for a sesame seed plant to produce viable seeds?
A sesame seed plant typically matures in 75–100 days from sowing, depending on the variety and growing conditions. Early-maturing types (like Tiflocal) may yield seeds in as little as 60–70 days, while slower varieties can take up to 120 days. Monitor pods—when they turn brown and papery, they’re ready for harvest!
Can I grow sesame seeds year-round, or do they need a specific season?
Sesame seeds thrive in warm climates (70–85°F) and are best planted in spring or early summer. In cooler regions, start indoors 4–6 weeks before the last frost or use a greenhouse. Avoid planting when nighttime temps drop below 60°F, as cold stress can stunt growth or reduce seed quality.
What’s the easiest way to troubleshoot yellowing leaves on my sesame plant?
Yellowing leaves often signal overwatering, nutrient deficiency, or fungal issues. First, check soil moisture—sesame plants prefer well-drained soil and wilt if soggy. If leaves turn pale yellow, add a balanced fertilizer (10-10-10) or compost. For brown spots, improve airflow and avoid overhead watering to prevent mildew.
Are there drought-tolerant sesame seed varieties I can grow with less water?
Yes! Varieties like Bhima and Vasudha are drought-resistant and ideal for arid climates. To conserve water, mulch around plants (use straw or grass clippings) and water deeply 2–3 times per week during dry spells. Sesame seeds also benefit from drip irrigation, which delivers moisture directly to roots.
What can I do with sesame seeds if my plants don’t produce many?
Even a small harvest has uses! Dry and store seeds in an airtight container for up to 6 months to use in baking, hummus, or tahini. If yields are low, try hand-pollinating flowers with a soft brush in the morning. Alternatively, save seeds for next season or compost unused plants—sesame plants enrich soil with nitrogen!
Wrapping up and next steps
Growing a sesame seed plant for year-round harvests is simpler—and more rewarding—than you might think! Whether you’re a seasoned gardener or just starting out, this hardy plant thrives with minimal fuss, delivering nutrient-packed seeds 🌱 that are perfect for culinary and health benefits.
With the right soil, spacing, and care, you’ll enjoy a bountiful crop that keeps giving.
Ready to take the next step? Start small—plant a few seeds in pots or a dedicated garden bed—and watch your confidence (and harvest!) grow. Happy planting! 🌟