
Lawn
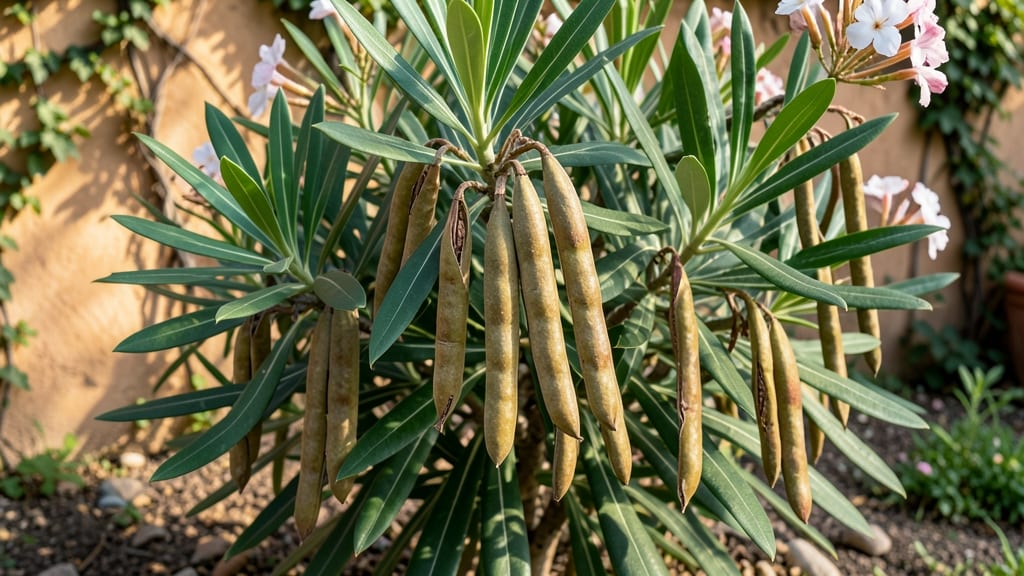
Extracting oleander seeds without twisting those stubborn pods is the first step to growing your own fragrant, drought-resistant shrubs. 🌿 I’ve wrestled with these tough seed pods for years—and finally cracked the secret to opening them cleanly while keeping seeds intact. The key?
A simple tool and a little patience, because forcing them only leads to broken seeds or empty pods. Most gardeners give up here, but oleander seeds are worth the effort: once germinated, they grow into plants that thrive in heat and poor soil, with blooms that last all summer.
The trick is harvesting pods when they’re fully brown and dry, then using a flathead screwdriver to gently pry them open without crushing the seeds inside. No more ruined seeds or wasted pods!
You’ll end up with plump, viable seeds ready for planting, and the germination process is surprisingly straightforward—just keep the soil warm and moist. The first true leaves appear in about 3-4 weeks, and by summer, you’ll have sturdy seedlings ready for transplanting. The real payoff?
A privacy screen or specimen plant that’s uniquely yours, grown from seed. This method works for any oleander variety, from the classic pink ‘Petite Salmon’ to the bold red ‘Splendens’. Just remember: wear gloves when handling pods and seeds—oleander is toxic if ingested.
With these steps, you’ll bypass the frustration and get seeds that actually sprout.
📚 In This Guide
- What you need
- Instructions
- Tips and common mistakes
- Wrapping up and next steps
What you need
- ● Mature oleander seed pods: 5–10 fully dried, brown pods (harvested when they split open naturally or gently cracked open).
- ● Sharp pruning shears or scissors: Clean, sterilized pair (for harvesting pods from the plant).
- ● Paper towels or newspaper: 2–3 sheets (for drying seeds).
- ● Small bowl or container: Shallow and wide (for seed extraction).
- ● Plastic bag or airtight container: With a zip-top (for seed storage).
- ● Rubbing alcohol (70% or higher): Small bottle (for sterilizing tools).
- ● Water spray bottle: For moistening pods if needed.
- ○ Fine-mesh strainer or sifter: Optional but helpful for separating seeds from chaff.
- ● Gloves (nitrile or latex): Highly recommended! Oleander sap can irritate skin. 🧤
- ● Magnifying glass: For inspecting seeds for quality.
- ● Seed tray or small pots: With well-draining soil mix (for immediate germination testing).
- ● Humidity dome or plastic wrap: To create a mini greenhouse effect.
- ● Labeling tags: Waterproof markers + tags (to track seed batches).
- ● Hair dryer (cool setting): For speed-drying seeds if impatient! ⏳
Step-by-step guide to extracting oleander seeds safely
Here’s how to open those tough seed pods without damaging seeds or yourself.
🌱 Step 1: Gather Mature Seed Pods
Wait until the oleander seed pods turn brown and papery—this means they’re fully mature and ready for seed extraction. I always pick them in late fall when the pods are dry but still intact. Avoid green pods; they won’t open properly and may contain immature seeds that won’t germinate.
Wear thick gloves—oleander sap can irritate skin. Place the pods in a paper bag and let them sit for 24 hours to ensure they’re completely dry. This prevents mold and makes the pods easier to open without breaking.
🪴 Step 2: Open Pods Without Twisting
Lay a pod on a flat surface and press firmly along the seam with your thumb. The pod should split open naturally—no twisting needed. If it resists, let it dry another day. Twisting risks crushing seeds or snapping the pod prematurely.
Once open, carefully pry apart the two halves with a small knife or your fingers. You’ll see flat, brown seeds inside. Remove them gently—don’t rub or shake, as this can damage the seed coat.
💧 Step 3: Clean and Prepare Seeds for Germination
Spread the seeds on a paper towel and let them air-dry for 1-2 hours. This removes any residual sap that could inhibit germination. I like to place them near a fan on low to speed up drying without overheating.
After drying, store the seeds in a paper envelope in a cool, dry place. Oleander seeds can stay viable for years, but fresh seeds germinate best. Label the envelope with the date—this helps track germination rates.
☀️ Step 4: Stratify for Better Germination Rates
Oleander seeds benefit from stratification to break dormancy. Place the seeds in a ziplock bag with a damp paper towel, seal it, and refrigerate for 4-6 weeks. Check weekly—if the towel dries out, mist it lightly.
After stratification, plant the seeds ¼ inch deep in sandy, well-draining soil. Oleander hates soggy roots, so mix in perlite to improve drainage. Keep the soil moist but not wet until germination, which takes 2-4 weeks in warm conditions (70-75°F).
⏰ Step 5: Transplant Seedlings Carefully
Once seedlings have 2-3 true leaves, they’re ready for transplanting. Harden them off by placing them outside in partial shade for 1-2 hours daily over 7-10 days. This toughens their stems for full sun.
Transplant in spring or fall when temperatures are mild. Oleander thrives in full sun but needs time to acclimate—direct sun too soon causes leaf scorch. Water deeply after planting to settle the roots.
Tips & tricks for perfect oleander seed extraction
These simple techniques will help you safely extract oleander seeds without damaging them or yourself.
Pod Selection: Look for pods that are completely brown and papery—any green or partially green pods should be avoided. They won't open properly and may contain immature seeds. I've found that pods harvested in late fall are the most reliable, as they've had time to fully mature and dry out naturally. If you're unsure, give them an extra 24 hours in a paper bag to ensure complete dryness before attempting to open them.
The Right Tools for the Job: While the instructions mention using your thumb to open the pods, I've discovered that a small, flat-bladed butter knife works even better for stubborn pods. Slide the knife gently along the seam to avoid crushing the seeds inside. Always work on a soft surface like a folded towel to protect both the pods and your workspace from accidental scratches.
Seed Handling: Once you've pried open the pod, remove the seeds with a soft paintbrush or your fingers—never shake the pod or seeds. The delicate seed coat can be easily damaged, which reduces germination rates. I like to place the seeds on a clean paper towel immediately after extraction to catch any stray seeds that might fall during the process.
Stratification Shortcut: If you're in a hurry to plant, you can reduce the 4-6 week stratification period to 2-3 weeks by using a seed stratification mat set to 75°F. These mats create consistent warmth, which helps break dormancy faster. Just keep an eye on the damp paper towel—it should stay moist but not soggy throughout the process.
Pro Tips for Oleander Seed Pods
- These simple techniques will help you safely extract oleander seeds without damaging them or yourself.
- Pod Selection: Look for pods that are completely brown and papery—any green or partially green pods should be avoided.
- The Right Tools for the Job: While the instructions mention using your thumb to open the pods, I've discovered that a small, flat-bladed butter knife works even better for stubborn pods.
Frequently asked questions
Got questions about oleander seed pods?
You’re not alone! Here are some common queries—plus straightforward answers—to help you navigate germination like a pro.
When is the best time to harvest oleander seed pods?
Harvest seed pods when they turn tan or brown and begin splitting open naturally—usually late summer to early fall. Avoid green pods, as they’re not yet mature. If pods stay closed, gently twist them to release seeds (wear gloves—oleander sap is toxic!).
How long does it take for oleander seeds to germinate?
Germination can take 14–30 days under ideal conditions (warmth, moisture, and indirect light). Pre-soaking seeds for 24 hours in warm water may speed it up. Patience is key! If no sprouts appear after 6 weeks, try fresh seeds or adjust your setup.
Are oleander seed pods dangerous to handle?
Yes!
All parts of the oleander plant—including pods—contain cardiac glycosides, which are toxic if ingested or absorbed through cuts. Wear gloves, avoid skin contact, and wash hands thoroughly after handling. Keep kids and pets away from pods and seeds.
Can I use oleander seeds from store-bought plants?
Store-bought oleander plants may have sterile seeds or seeds treated to prevent germination. For reliable results, source seeds from mature, healthy outdoor plants with open pods. If unsure, test a few seeds in a small pot before committing to a full batch.
What do I do if my oleander seeds won’t sprout?
Try these fixes:
- Check moisture: Keep soil consistently damp (not soggy) with a humidity dome.
- Adjust temperature: Oleander seeds prefer 70–80°F. Use a heat mat if needed.
- Test seed viability: Scratch a seed—if it’s hard and intact, it may still germinate.
- Try stratification: Place seeds in the fridge for 2 weeks to mimic winter conditions.
Wrapping up and next steps
Mastering the art of extracting oleander seed pods without twisting them is a game-changer for germination success! 🌱 With the right tools—like sharp scissors, a clean workspace, and a touch of patience—you’re well on your way to nurturing these resilient plants.
Whether you’re a seasoned gardener or just starting out, every small step counts.
Ready to take the next step? Try germinating your seeds in a controlled environment—like a seed tray with moistened soil—and watch your oleander seedlings sprout with confidence. Happy gardening! 🌿