
Lawn
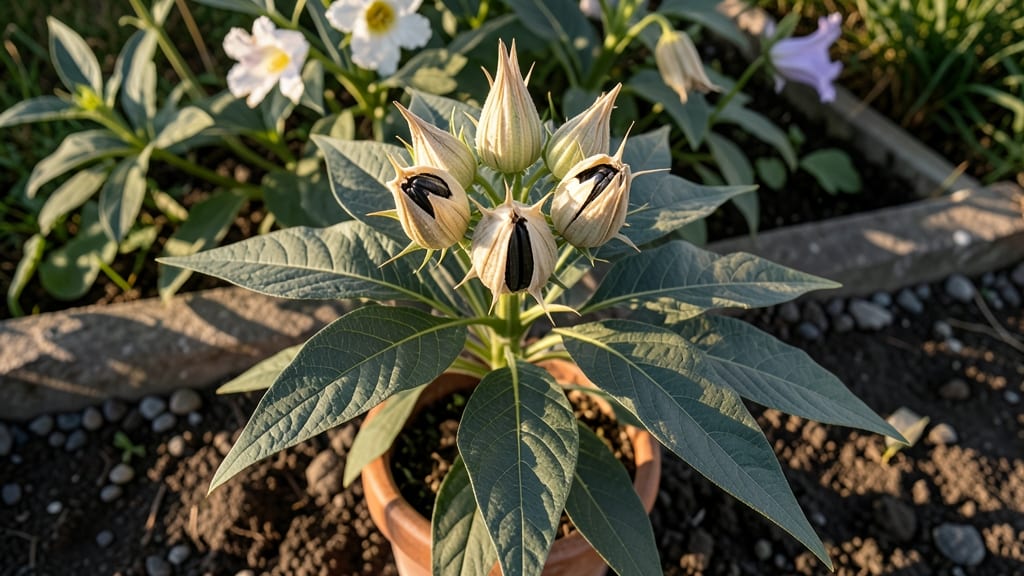
Moonflower datura seed pods are nature’s zero-waste seed-saving superstars—just wait until you see them pop open like tiny fireworks. 🌙 I’ve been growing datura for years, and harvesting those spiky pods is one of my favorite parts of the season.
They release seeds effortlessly, so you never have to worry about drying them out or losing them to pests.
The best time to harvest is when the pods turn brown and papery, usually in late summer or early fall, depending on your climate. You’ll know they’re ready when they start rattling—just give them a gentle shake, and seeds will rain down like confetti.
Store them in a cool, dry place until spring, and you’ll have fresh moonflowers blooming again in no time.
What makes this so special is how simple it is—no complicated drying racks or seed envelopes needed. Just let the pods do their thing, and you’ll have a steady supply of seeds for next year’s garden.
Plus, the plants are drought-tolerant and thrive in full sun, making them a low-maintenance addition to any space.
Just remember: Datura is toxic, so keep it away from pets and kids. Wear gloves when handling the pods, and always supervise children around the plants. With the right precautions, though, these striking flowers are a dream to grow—and their seeds are the easiest to save you’ll ever find.
📚 In This Guide
- What you need
- Instructions
- Tips and common mistakes
- Wrapping up and next steps
What you need
- ● Moonflower datura plants (Datura metel or Datura stramonium) – At least 1-2 mature plants (preferably with fully developed seed pods).
- ● Pruning shears or sharp scissors – For cleanly harvesting seed pods (sterilized with rubbing alcohol if reusing).
- ● Paper grocery bags or breathable mesh bags – 2-3 bags to collect pods (avoid plastic to prevent moisture buildup).
- ○ Gloves (optional but recommended) – Thin gardening gloves to protect against mild skin irritation from datura sap.
- ● Labeling tags or masking tape + marker – To label bags with the plant variety and harvest date.
- ● Drying tray or cardboard box – A flat, elevated surface to air-dry pods (line with newspaper or parchment paper).
- ○ Fan (optional) – A small, low-speed fan to speed up drying in humid climates.
- ● Fine-mesh sieve or colander – For separating seeds from chaff once pods are fully dried and opened.
- ● Small paper envelopes or seed packets – 5-10 envelopes to store seeds (label each with the year and variety).
- ○ Silica gel packets (optional) – 1-2 packets to keep seeds dry in humid storage areas.
- ● Patience – Moonflower seed pods take 2-4 weeks to fully dry and pop open naturally.
- ● Dry, well-ventilated space – Avoid damp areas to prevent mold (ideal temp: 60–75°F / 15–24°C).
- ● Basic knowledge of seed saving – Familiarize yourself with datura’s toxic properties (keep away from pets/kids!).
How to harvest and save moonflower datura seeds from popping pods
Watch those dramatic seed pods split open naturally—here's how to collect seeds before they scatter.
🌱 Step 1: Identify Ripe Moonflower Pods
Moonflower datura pods turn from green to dry brown when ready. They'll feel lightweight when gently squeezed—like an empty paper bag. The seams along the pod will start splitting open naturally, revealing the spiky seed clusters inside. I check pods daily in late summer because they open within hours once mature.
Don't wait until they burst open—seeds spread quickly and may get lost. The best time to harvest is when pods are fully brown but still closed. Use clean, dry hands or wear gloves if you have sensitive skin, as the pods contain mild toxins.
🪴 Step 2: Collect Seeds Before the Pods Pop
Use a small paper bag or envelope to collect seeds. Hold the pod over the bag and gently squeeze the sides to release the spiky seed clusters. The seeds will rattle inside—this is your signal they're ready. I like to work outdoors or over a tray to catch any seeds that might escape.
Don't worry about removing the spiky calyx (the outer part)—it protects the seeds during storage. Place the collected seeds in a dry, well-ventilated area for 2-3 days to dry completely. This prevents mold and ensures good germination. A sunny windowsill works perfectly.
☀️ Step 3: Store Seeds for Next Season
Once seeds are completely dry, transfer them to a paper envelope or small glass jar. Label clearly with the variety and harvest date—moonflower seeds stay viable for 2-3 years if stored properly. Keep them in a cool, dark place like a pantry or seed drawer.
Moonflower seeds are light-sensitive, so avoid plastic bags that trap moisture. The natural drying process ensures they'll pop open dramatically next season when planted in full sun and well-draining soil. Watch for those signature purple trumpet blooms in just 60-90 days!
⏰ Step 4: Plant Your Saved Seeds
Sow seeds directly in the garden after the last frost when soil is at least 60°F. Scatter them on the surface—moonflower seeds don't need light to germinate, but they won't sprout if buried too deep. Press them lightly into the soil and water gently.
Germination takes 10-21 days, so be patient. Thin seedlings to 12-18 inches apart once they reach 4-6 inches tall. The dramatic seed pods will return next season, making this a zero-waste growing cycle that rewards your attention.
Tips & tricks for perfect moonflower seed pod harvesting
Here's what nobody tells you about making this zero-waste process even easier—and more reliable.
Timing Secret: Those pods open faster than you think! I learned this the hard way after watching seeds scatter in seconds. Check them every morning and evening during late summer's peak heat. The pods will feel light and papery—like they're about to explode. If you miss the window, you'll have to wait until next year for a second chance.
Harvesting Hack: Use a small paper coffee filter instead of a bag—it's lightweight, breathable, and catches even the tiniest seeds that might escape. Hold the filter under the pod while gently squeezing, then fold it up and label it immediately. The filter's texture helps prevent seed loss during transfer.
Drying Wisdom: The 2-3 day drying period is non-negotiable for germination success. I place my seeds on a wire cooling rack in a sunny window, but avoid direct afternoon sun which can overheat them. If you live in a humid climate, add a small fan on low to improve airflow—this prevents mold without damaging the seeds.
Storage Strategy: For long-term viability beyond the 2-3 years mentioned, add a silica gel packet to your storage container. I use small glass vials with tight lids for individual varieties, storing them in my seed vault at 35-40°F (the coldest part of my fridge). This extends viability to 5+ years while maintaining that signature popping drama.
Pro Tips for Moonflower Datura Seed Pods
- Here's what nobody tells you about making this zero-waste process even easier—and more reliable.
- Timing Secret: Those pods open faster than you think! I learned this the hard way after watching seeds scatter in sec...
- Harvesting Hack: Use a small paper coffee filter instead of a bag—it's lightweight, breathable, and catches even the ...
Frequently asked questions
Got questions about moonflower datura seed pods?
You’re not alone! Here are some of the most common inquiries—and their answers—to help you master zero-waste seed saving with these fascinating pods.
When do moonflower datura seed pods open naturally?
Moonflower datura seed pods typically pop open on their own when fully mature, usually 4–6 weeks after flowering. You’ll know they’re ready when the pods turn brown, dry, and papery—a light tap should make them burst open like tiny firecrackers! If pods stay closed, they may need more time or warmth to dry.
How do I tell if the seeds inside are viable?
Viable moonflower datura seeds are plump, dark brown, and slightly wrinkled. Discard any that are shriveled, hollow, or moldy. For extra assurance, plant a few seeds—germination usually happens within 10–20 days if conditions (warm soil, indirect light) are right.
Are moonflower datura seed pods safe to handle?
While the seeds themselves are toxic if ingested (like all datura species), the dried pods pose no direct risk when handled carefully. Wear gloves if you’re sensitive to plant sap, and never crush or inhale seed dust. Always store seeds in a child/pet-proof container labeled clearly.
What if my pods won’t pop open on their own?
If pods resist, try these tricks:
- Dry them further: Spread pods in a well-ventilated, warm spot (like a sunny windowsill) for 1–2 extra weeks.
- Gently squeeze: Place the pod in a paper bag and lightly crush it with your hands—this mimics natural pressure.
- Freeze them: Pop pods into the freezer for 24 hours, then thaw. The temperature shift can trigger them to open.
Can I save seeds from store-bought moonflowers?
Yes! Even if your moonflowers are garden-center plants, their seed pods will produce viable seeds—just follow the same drying and popping steps. Pro tip: Cross-pollination is rare in moonflowers, so seeds will likely stay true to the parent plant’s traits (color, size, etc.).
Bonus Tip:
Turn seed-saving into a kid-friendly activity! Let children watch the pods pop (supervised, of course) and collect seeds—it’s a fun way to teach ecology and sustainability. Just remind them never to taste anything!
Wrapping up and next steps
Moonflower datura seed pods offer a magical, zero-waste way to save seeds while embracing nature’s cycles. Their dramatic pop-open display isn’t just visually stunning—it’s a reminder of how easy and rewarding sustainable gardening can be.
Whether you’re a seasoned gardener or just starting out, these pods prove that small acts of care can make a big difference.
Ready to try it? Start small—plant a few moonflower seeds this season and watch the process unfold. Who knows? You might just inspire others to explore the joy of seed-saving too! 🌙✨