
Lawn
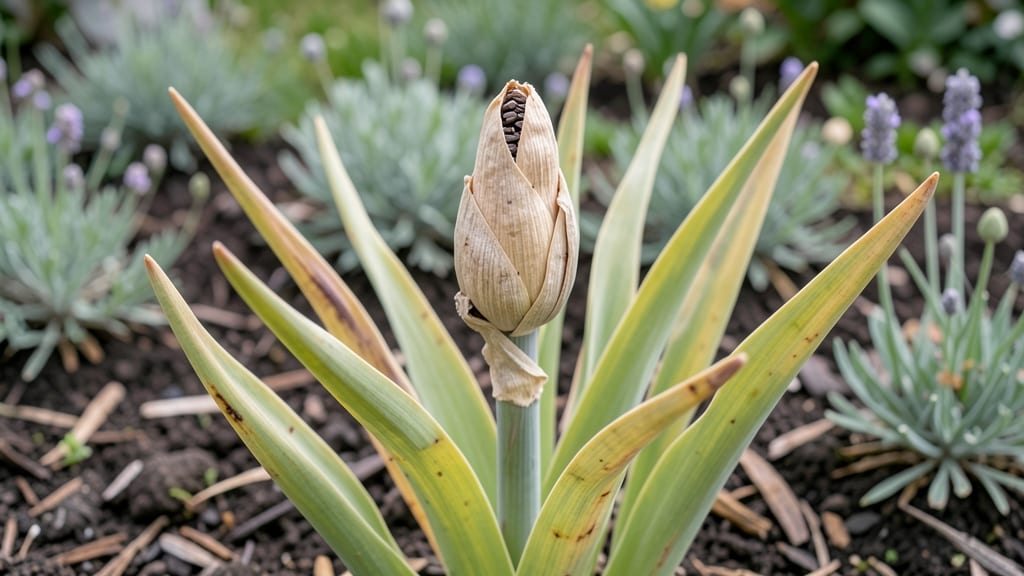
Hyacinths from seed pods? It’s possible—but not what you’d expect. 🌱 Most gardeners buy bulbs because seed-grown hyacinths take 3-5 years to bloom, and hybrids rarely come true. Still, if you’ve got pods and want to try, cold-stratification is your best shot at breaking dormancy and getting those sprouts started.
The first step is confirming viability: healthy pods are plump, dry, and split open naturally when mature. Once you’ve collected them, store the seeds in a paper bag in the fridge for 8-12 weeks to mimic winter.
This mimics the natural cycle and tricks seeds into thinking spring has arrived—without actually planting them yet.
After stratification, sow seeds in a shallow tray with well-draining soil, barely covering them. Keep them in a bright, cool spot (around 60°F) until germination, which can take 4-8 weeks. Patience is key—these aren’t the fast-growing annuals you’re used to, but the payoff is rewarding for dedicated gardeners.
Here’s the catch: seed-grown hyacinths may not match their parent’s color or form, especially with hybrids. For true blooms, bulbs are still the way to go—but if you’re curious or working with heirloom varieties, this method unlocks a slower, more experimental approach to growing these fragrant favorites.
📚 In This Guide
- What you need
- Instructions
- Tips and common mistakes
- Wrapping up and next steps
What you need
- ● Fresh or dried hyacinth seed pods – Collect 10–20 pods (or buy from a trusted supplier). Pro tip: 💡 Use pods from fully mature, healthy bulbs for best results!
- ● Cold-stratification medium – 2–3 cups of moistened perlite, sand, or peat moss (sterilized to prevent mold).
- ● Ziplock bags or airtight containers – 2–3 large, resealable bags (quart-sized or larger).
- ● Plastic wrap or breathable lid – To seal bags while allowing slight airflow.
- ● Potting mix – 1–2 gallons of well-draining, seed-starting mix (or a 50/50 blend of peat moss and vermiculite).
- ● Small pots or seed trays – 4–6 shallow containers (3–4 inches deep) with drainage holes.
- ● Pruning shears or scissors – For carefully opening seed pods without damaging seeds.
- ● Spray bottle – To mist the stratification medium and potting mix lightly.
- ○ Thermometer (optional but helpful) – To monitor fridge temps (aim for 35–45°F).
- ● Grow lights or sunny windowsill – For post-stratification sprouting (12–16 hours of light daily).
- ● Patience (and a calendar!) – Hyacinth seeds need 8–12 weeks of cold stratification before germination.
- ● Seed-starting heat mat (for faster germination after stratification).
- ● Humidity dome (to retain moisture during early growth).
- ● Fungicide (like hydrogen peroxide 3%) – Dip seeds briefly to prevent rot.
- ● Label markers – To track pod sources and stratification dates!
Step-by-Step instructions for cold-stratifying hyacinth seed pods
Hyacinths need a little patience and a cold winter trick to break dormancy—here’s how to do it right.
🌱 Step 1: Harvest and Prepare the Seed Pods
Collect mature seed pods after they’ve fully dried on the plant—this usually happens 4-6 weeks after flowering, when the pods turn brown and papery. Gently twist them off the stem and remove any remaining seeds that haven’t fully matured. Store the pods in a paper bag (not plastic) in a cool, dry place for 4-6 weeks to ensure full dryness.
If you’re working with fresh pods, crack them open carefully with a small knife or your fingers—hyacinth seeds are tiny and black, like tiny coffee beans. Avoid crushing them, as they’re delicate. Here’s the thing—these seeds need cold stratification to germinate, so don’t rush this step. The longer they dry, the better they’ll perform later.
❄️ Step 2: Cold-Stratify the Seeds for Dormancy Break
Fill a ziplock bag with damp (not soggy) sand or perlite—this mimics the natural winter chill hyacinths experience. Add the dried seed pods to the bag, seal it tightly, and place it in the refrigerator (not the freezer) for 8-12 weeks. This cold period tricks the seeds into thinking winter has passed, and they’ll start preparing for spring.
Check the bag every 2 weeks to ensure the sand stays evenly moist but not dripping. If it dries out, the stratification process fails. You’ll know it’s working when the pods start to soften slightly—this means the seeds are breaking dormancy. Real talk: Skipping this step means waiting years for germination, if it ever happens.
🌱 Step 3: Sow the Stratified Seeds
After 8-12 weeks in the fridge, remove the pods and carefully extract the seeds. Plant them ½ inch deep in a well-draining seed-starting mix—hyacinths hate soggy roots. Use a small pot or seed tray with multiple cells (since you’re likely starting 4 plants), and space them 1 inch apart. Press the soil lightly around each seed to ensure good contact.
Water gently with a spray bottle until the soil is evenly moist but not waterlogged. Place the tray in a bright, indirect light spot—no direct sun yet. Hyacinth seedlings are slow to emerge, so be patient. You’ll see the first tiny shoots in 4-8 weeks, but don’t be surprised if it takes longer. The key is consistency: Keep the soil moist but not wet during this time.
☀️ Step 4: Provide Light and Gradually Acclimate
Once the seedlings appear, move them to a sunny windowsill or under grow lights for 12-14 hours of light daily. Hyacinths need bright, indirect light to grow strong—too much direct sun at this stage can scorch their delicate leaves. If you notice the seedlings stretching toward the light (called "leggy"), they need more intensity.
After 6-8 weeks of growth, when the seedlings have 2-3 sets of true leaves, it’s time to harden them off. Place them outside in a sheltered spot for 1-2 hours the first day, gradually increasing their time outdoors over 10-14 days. This prepares them for transplanting into the garden or larger pots. Don’t skip this—hyacinths are finicky about sudden changes.
🪴 Step 5: Transplant and Winterize for Future Blooms
Transplant the seedlings into individual pots or directly into the garden in early fall—hyacinths need 6-8 months to establish roots before blooming. If planting in the ground, choose a spot with full sun to partial shade and well-draining soil. Dig a hole twice as wide as the root ball and mix in a small handful of bone meal for phosphorus, which encourages root and flower development.
After transplanting, water deeply to settle the soil around the roots, but avoid overwatering—hyacinths are drought-tolerant once established. Mulch lightly with 2 inches of organic matter to protect the roots over winter. Here’s the fun part: These plants won’t bloom for 2-3 years, but once they do, they’ll reward you with fragrant clusters for decades. Patience pays off with hyacinths!
Tips & tricks for perfect hyacinth seed germination
Patience and precision are your best friends when working with these delicate blooms—here's how to maximize success.
Pod Selection: Look for pods that are completely brown and papery when harvesting in Step 1, as these indicate full maturity. If you harvest too early, the seeds won't have fully developed, and germination rates plummet. I've learned this the hard way after planting premature pods that yielded only 10% success. The 4-6 week drying period is non-negotiable—this ensures the seeds are ready for stratification.
Stratification Strategy: During the 8-12 week cold stratification in Step 2, place your ziplock bag in the crisper drawer of your refrigerator where temperatures stay most consistent. The damp sand should feel like a wrung-out sponge—if you squeeze it, a few drops should come out, but it shouldn't drip. I mark the bag with a permanent marker when I first place it in the fridge, then check again at the 6-week mark to ensure the moisture level hasn't changed. This consistency is what breaks dormancy effectively.
Sowing Technique: When planting in Step 3, use a toothpick to create tiny holes in the seed-starting mix—this prevents disturbing the delicate seeds when pressing them into place. The ½-inch depth is crucial; planting too shallow can expose seeds to drying out, while planting too deep may prevent them from reaching the surface. I've found that gently pressing the soil around each seed with a small spoon creates better soil contact than just dropping them in.
Light Management: For the 12-14 hours of light in Step 4, if you don't have grow lights, position your seedlings on an east-facing windowsill where they'll receive gentle morning sunlight. Avoid south-facing windows which can deliver intense midday rays that scorch the tender leaves. I've noticed that seedlings under grow lights develop more robust stems and leaves compared to those under natural light alone.
Pro Tips for Hyacinth Seed Pods
- Patience and precision are your best friends when working with these delicate blooms—here's how to maximize success.
- Pod Selection: Look for pods that are completely brown and papery when harvesting in Step 1, as these indicate full maturity.
- Stratification Strategy: During the 8-12 week cold stratification in Step 2, place your ziplock bag in the crisper drawer of your refrigerator where temperatures stay most consistent.
Frequently asked questions
Got questions about working with hyacinth seed pods? You’re not alone! Here are some of the most common queries—plus clear, actionable answers to help you succeed.
What’s the best time to harvest hyacinth seed pods?
Harvest seed pods when they turn brown and papery (usually 6–8 weeks after flowering). Wait until they’re fully dry but haven’t split open—this ensures maximum seed viability. Avoid harvesting in wet weather to prevent mold.
How long does cold stratification take for hyacinth seeds?
Cold stratification typically requires 8–12 weeks in the fridge (34–40°F). Place moistened seeds in a sealed bag with damp peat moss or paper towels, then check monthly for sprouting. Patience is key—rushing can reduce germination rates!
Can I grow hyacinths from seed pods without stratification?
While possible, stratification dramatically improves success rates. Without it, seeds may take years to germinate or fail entirely. If you’re impatient, try soaking seeds in water for 24 hours first—it can kickstart the process slightly.
Why aren’t my hyacinth seeds germinating after stratification?
Check these troubleshooting steps:
- Moisture: Seeds must stay consistently damp (not soggy). Use a spray bottle to avoid overwatering.
- Temperature: Keep them in the fridge—room temp can wake them too soon.
- Light: Some seeds need bright, indirect light after stratification. Try a sunny windowsill.
- Age: Older seeds (over 1 year) may lose viability. Start fresh!
How do I know if my hyacinth seeds are still viable?
Test viability by filling a glass with water, adding seeds, and waiting 24 hours. Floating seeds = dead; sinking seeds = potentially viable. For extra peace of mind, store seeds in a cool, dry place (like the fridge) until ready to stratify.
Wrapping up and next steps
Hyacinth seed pods offer a rewarding way to grow these fragrant blooms from scratch—but success hinges on patience and cold stratification. By following the right steps—from harvesting to chilling and planting—you’ll unlock reliable, vibrant blooms year after year. 🌱
Ready to dive in? Start with a small batch of pods, experiment with timing, and soon you’ll be sharing your homegrown hyacinths with pride. Your garden’s next masterpiece is just a few weeks away!