
Size
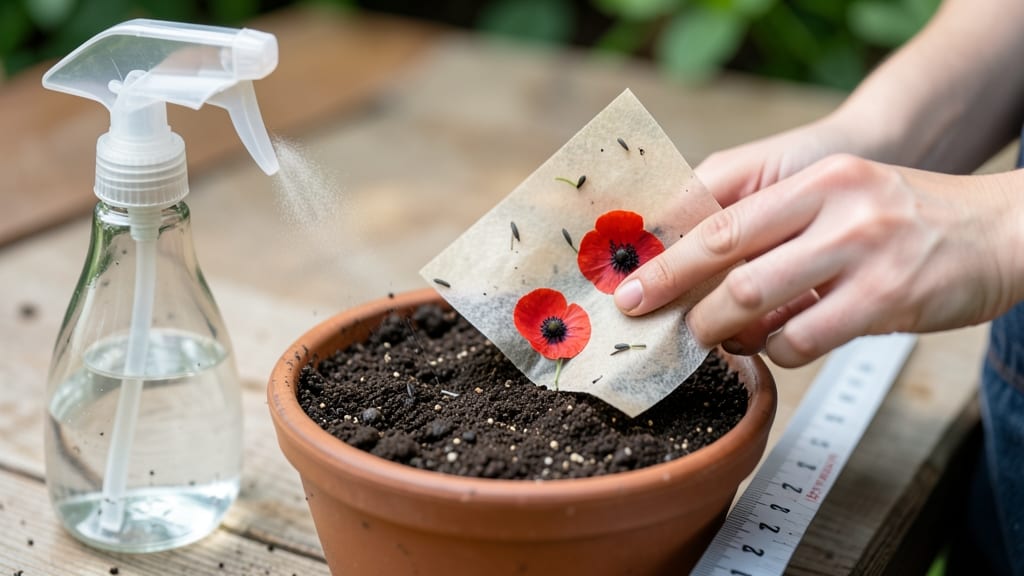
Growing seed paper blooms into living flowers you can plant anywhere—no soil, no mess, just pure magic. 🌸 I’ve turned my old seed packets into vibrant wildflower meadows by embedding seeds in paper, and it’s easier than you’d think.
The key is patience and keeping the paper consistently moist until those first green sprouts appear.
You’ll need just three things: seed paper (available online or DIY with paper pulp), a shallow tray, and a spray bottle. Place the paper on damp paper towels or a seed-starting mat, then mist lightly every day.
Within 7-14 days, you’ll see tiny shoots breaking through—proof that even a windowsill can turn into a garden.
The best part? These aren’t just flowers—they’re eco-friendly gifts, biodegradable decorations, or instant pollinator havens. Plant them in gardens, pots, or even tucked into cracks in sidewalks. Just avoid direct sun until roots establish, and watch your paper transform into a living masterpiece.
Troubleshooting is simple: if germination is uneven, try soaking the paper first. Mold? Reduce moisture and improve airflow. With a little care, you’ll have blooms in weeks—not months—turning any space into a burst of color and life.
📚 In This Guide
- What you need
- Instructions
- Tips and common mistakes
- Wrapping up and next steps
What you need
- ● Wildflower seeds: Choose fast-growing, easy-to-grow varieties like cosmos, marigold, or sunflower. Aim for 1–2 teaspoons per sheet (adjust based on paper size).
- ● Unbleached paper: Use 100% post-consumer recycled paper (e.g., printer paper, cardstock, or watercolor paper). Avoid glossy or coated paper—it won’t absorb well!
- ● Water: Distilled or boiled (to kill bacteria) is ideal, but tap water works in a pinch.
- ● Flour or cornstarch: Acts as a natural binder. Use 1 part flour to 2 parts water for a smooth paste.
- ● Acrylic paintbrush or foam brush: A wide, flat brush (1–2 inches) works best for spreading the mixture evenly.
- ● Baking sheet or tray: Line with parchment paper or wax paper for easy removal.
- ● Natural dyes (e.g., turmeric, beet juice) for colored paper.
- ● Essential oils (like lavender) for fragrance and pest resistance.
- ● A rolling pin or smooth surface to press out air bubbles.
- ● Seed packets with wildflower blends for variety.
Step-by-Step instructions for making your own seed paper
Here's how to create beautiful, plantable paper that grows into vibrant flowers—no green thumb required.
🌱 Step 1: Gather Your Materials
Start with 1 cup wildflower seeds (choose a mix with fast-growing varieties like cosmos or marigold for best results). You'll also need 2 cups water, 1 cup cotton lint-free paper pulp (or shredded paper), and 1 tablespoon cornstarch to bind everything together. I like to use a blender for this step—it creates a smooth, even mixture without clumps.
If you don't have paper pulp, tear up 4-5 sheets of printer paper into tiny pieces and soak them in warm water for 10 minutes first. The goal is a slurry that's thick but still pourable—like heavy cream. Real talk: if it's too thick, add a splash more water; if too thin, stir in a pinch more pulp.
💧 Step 2: Mix the Seed and Paper Blend
In a large bowl, combine the soaked pulp with the 1 cup water and 1 tablespoon cornstarch. Stir until smooth, then pulse in the blender with ½ cup water until fully blended. The mixture should look like thick, opaque paint. Now, gently fold in the 1 cup wildflower seeds—don't overmix or you'll crush them.
Here's the thing—distribute seeds evenly. I like to sprinkle them over the pulp first, then fold the mixture like a burrito to coat everything. This ensures every piece of paper has a chance to grow. If you see clumps of seeds, gently break them apart with your fingers.
☀️ Step 3: Pour and Dry the Paper
Lay a large plastic sheet on a flat surface and pour your seed-pulp mixture evenly across it. Use a spatula or ruler to spread it into a ¼-inch thick layer. The thinner you pour, the easier it'll be to tear later. Let it dry completely—this takes 24-48 hours depending on humidity.
Pro tip: Place the sheet in a warm, dry spot with good airflow (like a sunny windowsill). If you live in a damp climate, prop up the edges with books to prevent curling. You'll know it's ready when you can peel it off easily—no sticking or tearing.
✂️ Step 4: Cut and Plant Your Seed Paper
Once dry, carefully peel the paper off the plastic and cut it into 4-inch squares (or any shape you like). Store them in a cool, dry place until ready to plant. The best time to use them is in spring or early fall, when soil temperatures are between 60-75°F—this gives seeds the ideal conditions to sprout.
To plant, simply place the paper on top of prepared soil in a garden bed or container. Press lightly so it makes contact with the earth, then water gently. You'll see first sprouts in 7-14 days, depending on the flower mix. Avoid walking on the bed until flowers are established—delicate seedlings can be crushed easily.
🌿 Step 5: Maintain and Enjoy Your Blooms
Keep the soil consistently moist but not soggy—seed paper holds moisture well, but it won't last forever. Once flowers bloom (usually 6-8 weeks after planting), you can let them go to seed for next year or deadhead to encourage more blooms. I've used this paper in hanging baskets, window boxes, and even as temporary ground cover for weddings—it's surprisingly versatile.
Here's where it gets fun: watch the paper decompose naturally as roots grow through. It's like magic—one day you're planting paper, the next you've got a living garden. Just don't expect it to last beyond one season; the paper breaks down as the plants mature.
Tips & tricks for perfect plantable paper
Even the simplest project can turn into a gardening masterpiece with these small but mighty adjustments.
Seed Distribution Secret: In Step 2, when folding in the wildflower seeds, think of them like chocolate chips in cookie dough—you want every bite to have a chance to shine. Sprinkle seeds evenly over the pulp first, then fold the mixture like a burrito to create pockets of seeds throughout. This ensures every 4-inch square has the potential to grow, not just a few lucky spots. If you notice clumps after folding, gently break them apart with your fingers—no need to overmix, just distribute.
Drying Strategy: The 24-48 hour drying time in Step 3 is your magic window, but humidity can turn this into a waiting game. Place your plastic sheet on a baking rack or wire cooling rack instead of directly on a surface—this allows airflow on all sides. If you live in a damp climate, prop up the edges with books to prevent curling. A hairdryer on low heat can help speed things up in the final 10 minutes if you're impatient (just don't overdo it—you want dry, not crispy).
Planting Pro Tip: When planting your seed paper in Step 4, don't just drop it on soil—give it a little love. Press each square gently but firmly so it makes full contact with the earth. For containers, place a small layer of soil first, then the paper, then a thin layer on top. This sandwich method ensures roots can grow through while protecting the delicate paper from wind. Water gently from the bottom up to prevent washing away seeds.
Pro Tips for Grow Seed Paper
- Even the simplest project can turn into a gardening masterpiece with these small but mighty adjustments.
- Seed Distribution Secret: In Step 2, when folding in the wildflower seeds, think of them like chocolate chips in cook...
- Drying Strategy: The 24-48 hour drying time in Step 3 is your magic window, but humidity can turn this into a waiting...
Frequently asked questions
Got questions about growing seed paper? You’re not alone!
Here are some of the most common queries—and their easy answers—to help you turn your plantable paper into a thriving garden.
1. How long does it take for seed paper to sprout?
Seed paper typically sprouts within 7–14 days, depending on moisture, temperature, and seed type. Keep it damp (not soggy) and place it in indirect sunlight or a seed tray until you see tiny green shoots. Patience is key—some varieties (like wildflowers) take longer than herbs or grasses.
2. Can I plant seed paper directly in the ground?
Once your seed paper is damp and ready, simply press it into moist soil (or a pot) and cover lightly with a thin layer of dirt. Water gently to help it settle. For best results, plant in spring or fall when temperatures are mild—avoid extreme heat or frost.
3. What if my seed paper molds or doesn’t sprout?
Mold (fuzzy spots) or no sprouts often mean too much moisture or poor airflow. Let the paper dry slightly between waterings, and avoid sealing it in a plastic bag. If it’s been 3+ weeks with no growth, try re-wetting it or planting fresh seeds from a backup packet.
4. Can I use seed paper indoors or in containers?
Yes! Seed paper thrives in containers, hanging planters, or even windowsill gardens. Use well-draining soil, water regularly, and place in bright, indirect light. Herbs (like basil) or small flowers (like pansies) work best for indoor projects—just ensure your container has drainage holes.
5. What’s the best way to store unused seed paper?
Store unused seed paper in a cool, dry place (like a sealed envelope or airtight container) away from direct sunlight. Avoid humidity—moisture can cause pre-sprouting or mold. Label it with the plant type and date for future reference! Most seed paper stays viable for 1–2 years.
Still stumped? Drop your question in the comments—we’re happy to help your seed paper bloom into success!
Wrapping up and next steps
Growing seed paper is a rewarding way to blend creativity with sustainability—turning simple materials into living art that blooms into beauty! 🌱 With just a few supplies and a little patience, you’ve got the power to create plantable paper that spreads joy (and flowers) wherever you place it.
Whether you’re gifting it, decorating your space, or teaching kids about nature, every sheet holds the promise of new life.
Ready to take the next step? Experiment with different seed blends, try unique designs, or even turn this into a fun DIY project with friends or students. The world needs more green thumbs—and your seed paper is the perfect place to start! 🌸