
Planting
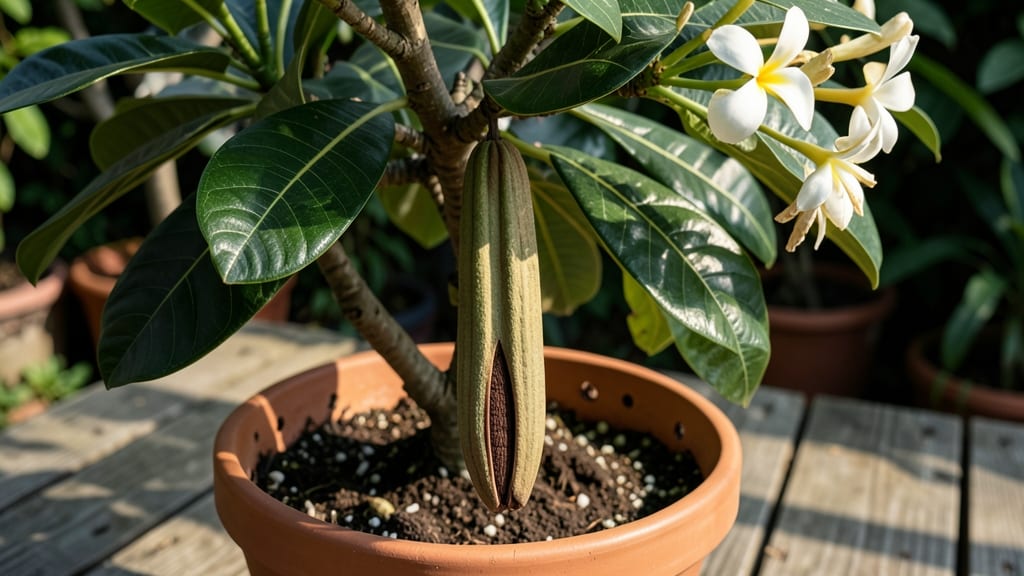
Harvesting plumeria seed pods turns garden waste into future fragrant trees. 🌿 The moment those brown pods split open, you're holding the potential for new plants—no store-bought seedlings needed. My first attempt yielded three healthy seedlings, and I've been growing from seed ever since.
Start by collecting mature pods when they turn brown and crack open naturally. Inside, you'll find flat, papery seeds that need immediate attention. The key to success is moisture and warmth—plumeria seeds germinate best in a mix of perlite and peat moss kept at 75-85°F.
Plant them shallowly, just covering the top, and keep the soil damp but never soggy.
Germination can take 4-12 weeks, so patience is key. Once sprouted, provide bright, indirect light and protect seedlings from drafts. You'll watch those first true leaves emerge, signaling the start of a new plumeria tree with minimal effort.
This method works year-round in warm climates, and even in cooler zones, you can start seeds indoors. The payoff? Fragrant blooms and zero waste—just nature's way of recycling. Here's how to make it work for you.
📚 In This Guide
- What you need
- Instructions
- Tips and common mistakes
- Wrapping up and next steps
What you need
- ● Mature Plumeria Plant: A healthy, blooming plumeria (preferably Plumeria rubra or Plumeria obtusa) with seed pods forming after flowering.
- ● Seed Pods: 5–10 ripe pods (brown, dry, and slightly papery—avoid green or soft ones!).
- ● Sharp Pruning Shears: Small, clean shears (sterilized with rubbing alcohol) to snip pods without damaging the plant.
- ● Paper Towels or Newspaper: For drying and separating seeds (1–2 sheets).
- ● Plastic Bag or Airtight Container: To store seeds temporarily (e.g., a ziplock bag with a tiny hole for airflow).
- ● Seedling Trays or Small Pots: 2–4 biodegradable pots (3–4 inches wide) or trays with drainage holes.
- ● Well-Draining Potting Mix: A blend of 50% coconut coir, 30% perlite, and 20% compost (avoid heavy garden soil!).
- ● Spray Bottle: Filled with room-temperature water for gentle misting.
- ○ Clear Plastic Dome or Zip-Top Bag: To create a humid microclimate (optional but helpful for germination).
- ● Rubbing Alcohol (70%+) & Cotton Swabs: For sterilizing tools and pods (reduces mold risk).
- ● Fine-Mesh Sieve: To sift out chaff and isolate seeds (if pods are fibrous).
- ○ Heating Mat (Optional): Set to 75–85°F to speed up germination (great for cooler climates!).
- ● Grow Lights or Sunny Windowsill: A south-facing window or LED grow light (12–14 hours/day) for seedling growth.
- ● Fertilizer (Balanced 10-10-10 or Seaweed Extract): Diluted to ½ strength for young seedlings (apply after 4–6 weeks).
- ● Labeling Tags & Marker: To track seed pod sources and planting dates.
- ○ Gloves (Optional): Latex or nitrile gloves if you’re sensitive to sap or mold spores.
How to harvest and germinate plumeria seed pods for new plants
With just a few simple steps, you can turn those iconic seed pods into thriving plumeria seedlings.
🌱 Step 1: Identify and Harvest Mature Seed Pods
Plumeria seed pods turn from green to brown and papery when fully mature—this usually happens in late summer to early fall depending on your climate. Gently twist the pod from the stem; it should release easily when ready. Avoid cutting the stem, as this can stress the parent plant.
I always harvest pods that have dried completely but haven’t split open yet. If the pod feels soft or still green, leave it on the plant—it needs more time. Once harvested, store pods in a cool, dry place (like a paper bag) until you’re ready to process them. This prevents premature drying or mold.
💧 Step 2: Extract Seeds and Prepare for Germination
Open the pod carefully—it will split naturally along its seams. Inside, you’ll find flat, dark seeds surrounded by fluffy fibers. Remove the seeds and discard the fibrous material. Plumeria seeds have a hard outer shell, so soak them in warm water for 24 hours to soften the coating. This step is critical—skipping it delays or prevents germination.
After soaking, rinse the seeds gently and lay them on a paper towel to dry slightly. You’ll know they’re ready when the outer shell feels slightly less resistant to the touch. I like to plant them within 2-3 days of soaking to maintain viability. If you’re not ready, store them in a sealed container with a damp paper towel in the fridge for up to 2 weeks.
☀️ Step 3: Plant Seeds in a Warm, Well-Draining Medium
Fill a 4-inch pot with a mix of 50% perlite and 50% peat moss—this ensures fast drainage while retaining enough moisture. Plumeria seeds need warmth to germinate, so place the pot in a seedling heat mat set to 75-85°F. Plant seeds ¼ inch deep, spacing them 1 inch apart in the pot.
Water lightly until the soil feels evenly moist but not soggy. Cover the pot with clear plastic wrap to create a mini greenhouse effect, which helps maintain humidity. Place the pot in bright, indirect light—direct sun can overheat the soil. Germination typically takes 2-4 weeks, but don’t be surprised if it takes longer, especially in cooler conditions.
🌿 Step 4: Transplant Seedlings and Provide Year-Round Care
Once seedlings develop 2-3 true leaves (not the initial seed leaves), transplant them into individual 6-inch pots with the same perlite-peat mix. Plumeria seedlings are sensitive to root disturbance, so handle them gently. Keep them in bright, indirect light for the first 2 weeks after transplanting to reduce stress.
After the initial adjustment period, gradually introduce them to morning sun for 1-2 hours daily, increasing exposure over 2 weeks. Plumerias thrive in full sun but need time to acclimate. Water when the top inch of soil feels dry, and avoid letting them sit in waterlogged soil—this is the #1 killer of young plumeria plants.
⏰ Step 5: Encourage Growth and Prepare for Outdoor Planting
By 6 months old, your seedlings should be sturdy enough for outdoor planting. Choose a location with well-draining soil and full sun exposure. Dig a hole twice as wide as the root ball but no deeper. Plumeria roots spread horizontally, so avoid burying the stem too deeply.
After planting, water deeply and apply a slow-release fertilizer to support growth. Plumerias grow slowly at first but reward patience with fragrant blooms in 1-2 years. Prune leggy growth to encourage bushier plants, and protect young plants from frost—they’re tropical at heart and won’t tolerate cold.
Tips & tricks for perfect plumeria seed pod germination
Here's what nobody tells you about maximizing your chances with these delicate tropical seeds.
Pod Maturity Matters: The 24-hour soaking time for seeds is non-negotiable, but the quality of your pods makes all the difference. Harvest only when they're completely brown and papery—any green or soft pods will yield poor germination rates. I've learned this the hard way after wasting weeks on underripe pods. Store harvested pods in a paper bag in a cool, dry place to maintain viability until you're ready to process them.
The Heat Factor: Maintaining that 75-85°F range for germination is critical, but not all heat mats are created equal. If you don't have one, try placing your pots on top of your refrigerator (not inside) where it stays consistently warm. The key is consistent warmth—fluctuations can shock the seeds and delay germination. I've seen germination times stretch from 2 weeks to over a month when temperatures varied by more than 10°F.
Transplanting Technique: When moving your seedlings to individual 6-inch pots, handle them like they're made of glass—they're that delicate. Use the "grip-and-lift" method: grasp the seedling's base firmly but gently, then lift straight up without twisting. This minimizes root damage. After transplanting, keep them in bright indirect light for those first 2 weeks to prevent shock from direct sunlight.
Sunlight Acclimation: The gradual sun exposure method works wonders, but timing is everything. Start with just 1-2 hours of morning sun daily and increase by 30 minutes every 3-4 days. This prevents sunburn while building their resilience. I've had seedlings that looked perfect in indirect light turn crispy within hours when suddenly exposed to full sun. Patience here pays off with healthier plants.
Pro Tips for Plumeria Plant Seed Pod
- Here's what nobody tells you about maximizing your chances with these delicate tropical seeds.
- Pod Maturity Matters: The 24-hour soaking time for seeds is non-negotiable, but the quality of your pods makes all the difference.
- The Heat Factor: Maintaining that 75-85°F range for germination is critical, but not all heat mats are created equal.
Frequently asked questions
Got questions about harvesting and growing plumeria plant seed pods? You’re not alone! Here are some of the most common queries—and their answers—to help you navigate the process like a pro.
How do I know when plumeria seed pods are ready to harvest?
Plumeria seed pods turn from green to light brown or tan when mature, usually 3–6 months after flowering. Gently tap them—if seeds rattle inside, they’re ready! Avoid harvesting if pods are still firm or green, as seeds may not be viable.
Can I grow plumeria from seed pods, or should I use cuttings instead?
Both work, but seeds take 1–2 years to mature into flowering plants, while cuttings (from healthy stems) bloom in 6–12 months. Seeds are great for experimentation or rare varieties, but cuttings are faster for established growth. Pro tip: Soak seeds in warm water overnight to speed up germination!
How long does it take for plumeria seeds to germinate?
Germination can take 2–6 weeks (or longer) in warm, moist conditions (70–85°F). Keep soil consistently damp but not soggy, and place pods in indirect light. Patience is key—some seeds may need a stratification period (cool, moist treatment) to break dormancy.
What do I do if my plumeria seed pods won’t open naturally?
If pods stay closed, slice them open carefully with sterilized scissors to extract seeds. Discard any shriveled or moldy seeds. To encourage natural splitting, place pods in a paper bag for a few days—the movement may trigger them to open. Warning: Wear gloves—plumeria sap can irritate skin!
Can I harvest seed pods from store-bought plumeria plants?
Yes, but check if the plant is self-pollinated (many nursery plumerias are sterile hybrids). If flowers don’t produce pods, try cross-pollinating with a paintbrush or attract pollinators like bees. For guaranteed seeds, source pods from mature, outdoor-grown plumerias in tropical climates.
What’s the best climate for growing plumeria from seed?
Plumerias thrive in USDA Zones 10–12 (or as houseplants indoors). Seeds need warmth (65°F+) and high humidity to germinate. In cooler climates, start seeds indoors under grow lights, then transplant outdoors after the last frost. Fun fact: Some growers use heat mats to mimic tropical conditions!
Wrapping up and next steps
Growing plumeria from seed pods is a rewarding way to embrace zero-waste gardening while nurturing year-round blooms! 🌱 Whether you're a seasoned gardener or just starting, these pods offer a simple yet magical way to expand your tropical oasis.
Now that you’re armed with the right knowledge—from harvesting to planting—it’s time to get your hands dirty and watch your plumeria thrive.
Ready to take the next step? Start with just one pod and experiment with the techniques you’ve learned. Before you know it, you’ll be sharing your lush plumeria with friends—or even selling your own starts! Happy planting! 🌸