
Propagation
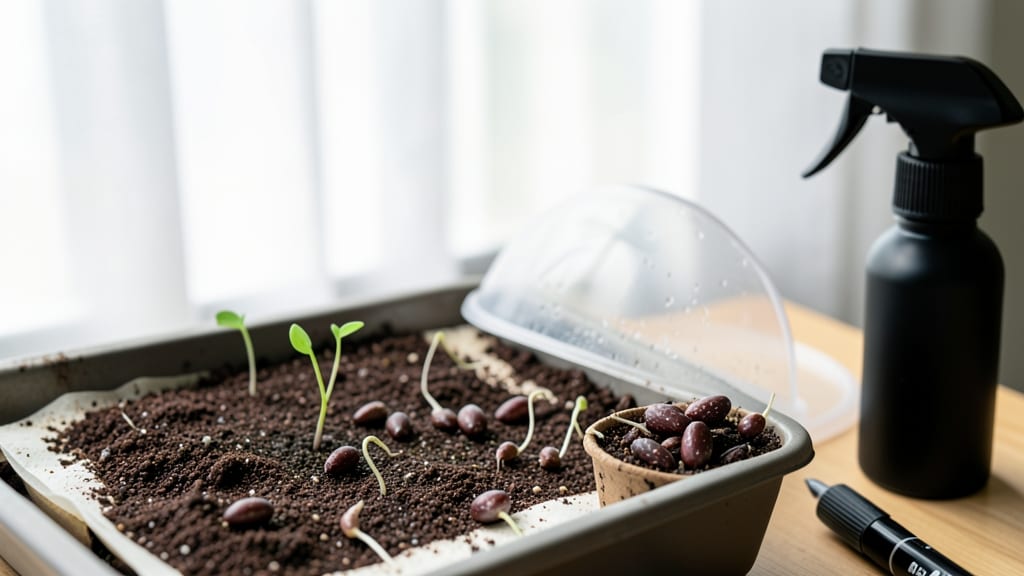
Morning glory seeds sprout best with a little prep—no twisty pods or wasted seeds. 🌱 The key to reliable germination lies in softening those tough shells before planting, which cuts your wait time in half and ensures every seed has a fighting chance.
Start by soaking seeds in warm water for 12-24 hours—this mimics nature’s rain-soaked soil and signals them it’s time to wake up.
Use a small container with just enough water to cover the seeds, then drain and plant them ½ inch deep in well-draining soil that’s kept consistently moist but never soggy. A clear plastic bag over the pot creates a mini greenhouse effect, speeding up germination while preventing mold.
You’ll see those first pale shoots poke through the soil in 5-14 days, depending on warmth. The trick is patience—morning glories don’t rush, but they do thrive when you give them the right start.
Once sprouted, thin to the strongest seedling per pod and watch them climb toward sunlight with surprising speed. This method works for both backyard vines and container gardens, and the zero-waste twist means you’ll save seeds from year to year.
No more struggling with stubborn germination—just reliable, twist-free growth from the get-go.
📚 In This Guide
- What you need
- Instructions
- Tips and common mistakes
- Wrapping up and next steps
What you need
- ● Morning glory seeds: Fresh, untreated seeds (10–20 per pot or tray for best results). Pro tip: 💡 Harvest seeds from fully mature pods (when they turn brown and split open naturally).
- ○ Seed-starting mix: Lightweight, well-draining potting soil (1–2 gallons, depending on container size). Optional: Add perlite or vermiculite (10–20%) for extra aeration.
- ● Containers: Seed trays with drainage holes (for sowing multiple seeds).
- ● OR Small pots (3–4 inches deep) if starting individually.
- ● Watering can or spray bottle: Fine mist setting to avoid disturbing seeds.
- ○ Plastic wrap or humidity dome: Keeps moisture in while seeds sprout (optional but helpful in dry climates).
- ● Grow lights or sunny windowsill: Morning glory seeds need warmth (70–75°F) and bright, indirect light (12+ hours/day post-germination).
- ● Twine or small stakes: For supporting vines once they sprout (3–4 feet long).
- ● Patience: Germination takes 7–14 days (sometimes longer in cool conditions).
- ● Consistent care: Keep soil moist but not soggy—overwatering drowns seeds!
- ● Outdoor space: Morning glories thrive in full sun (6+ hours/day) and warm climates (USDA zones 3–11).
- ○ Optional: A notebook to track germination progress (fun for kids or data lovers!).
Step-by-step instructions for germinating morning glory seeds
Here’s how to coax those delicate morning glory seeds into sprouts—without the frustrating tangles of traditional pod harvesting.
🌱 Step 1: Harvest and Prepare the Seed Pods
Wait until the seed pods turn deep brown and begin splitting open naturally—this ensures maximum viability. Gently twist the pods (not too hard!) to release the seeds inside. Avoid crushing them; morning glory seeds are tough but sensitive to rough handling. Spread the seeds on a clean, dry paper towel to air-dry for 24-48 hours before storage.
I like to store them in a small envelope labeled with the variety and harvest date. Keep them in a cool, dark place until ready to plant—this prevents premature sprouting. If you’re impatient, you can skip the drying step and plant immediately, but dried seeds last longer in storage.
💧 Step 2: Soak Seeds for Faster Germination
Morning glory seeds have a hard outer coating that slows germination. Soak them in lukewarm water for 12-24 hours before planting. Use a small bowl or jar—just enough water to cover the seeds completely. Stir occasionally to prevent mold. After soaking, drain and let them sit on a damp paper towel for another hour to soften further.
This step is non-negotiable if you want fast, uniform germination. Skipping it means waiting 2-3 weeks for sprouts instead of 7-10 days. I’ve found that soaking also reduces the risk of mold or rot later on, especially in humid climates.
☀️ Step 3: Plant Seeds in Warm, Well-Draining Soil
Sow seeds ½ inch deep in loose, well-draining soil—morning glories hate soggy roots. I use a seed-starting mix (not garden soil) to prevent compaction. Plant 4-5 seeds per spot since germination rates vary. Space them 6-8 inches apart if direct-sowing, or use small pots for transplants later.
Keep the soil consistently moist but not waterlogged. A spray bottle works best to avoid disturbing the seeds. Place the container in a warm spot (70-75°F)—a sunny windowsill or under a grow light speeds things up. Germination happens fastest in warmth and indirect light.
🌿 Step 4: Provide Gentle Light and Monitor Sprouts
Once seeds sprout, move them to bright, indirect light immediately. Too much direct sun now can scorch tender seedlings. Watch for first true leaves (the second set after the initial cotyledons)—this confirms successful germination. Thin to the strongest seedling per spot if you over-planted.
Morning glories grow fast but delicate. If seedlings look leggy or pale, they need more light. A south-facing window or grow light 4-6 inches away keeps them sturdy. Avoid overwatering—damping-off (a fungal disease) can kill seedlings overnight if the soil stays too wet.
⏰ Step 5: Transplant or Direct-Sow After Frost
Wait until nighttime temperatures stay above 50°F before transplanting outdoors. Morning glories are heat-loving annuals—they won’t survive frost. Harden off seedlings by placing them outside for 1-2 hours daily over 5-7 days, gradually increasing exposure.
If direct-sowing, plant seeds ½ inch deep in well-drained soil after the last frost. They thrive in full sun to partial shade and moderate moisture. Mulch lightly to retain soil warmth—this encourages faster vine growth and more abundant blooms.
Tips & tricks for perfect morning glory seed germination
These little-known tricks will help you bypass common pitfalls and get those morning glory seeds sprouting like clockwork.
Pod Harvesting Precision: When harvesting those deep brown pods, focus on the seam where they naturally split. Use a gentle twisting motion—think of unscrewing a jar lid—rather than pulling or crushing. The goal is to release seeds intact; even a slight crush can compromise viability. I’ve found that harvesting in the morning, when pods are slightly dew-damp, makes the twisting easier and cleaner. Store harvested seeds in a labeled envelope with the harvest date—this prevents mix-ups if you’re saving multiple varieties.
Soaking Science: The 12-24 hour soak isn't just about softening those tough seed coats—it's also a mold-prevention strategy. Use lukewarm water (about 85°F) rather than hot water, which can cook the seeds. Stir them every 6 hours to prevent anaerobic bacteria growth. After draining, the damp paper towel phase is crucial: it mimics natural moisture conditions while preventing waterlogging. Pro tip: If your kitchen is humid, reduce the soak time to 12 hours to avoid premature sprouting during storage.
Soil Temperature Secrets: Morning glories are tropical at heart, and they show it in their germination habits. While the instructions call for 70-75°F soil, I’ve noticed that seeds planted in soil at 72°F consistently sprout within 5-7 days, whereas cooler soil (below 70°F) can double that time. Use a soil thermometer to monitor—it’s a small investment that pays off in faster results. If you’re starting indoors, place your seed trays on top of your fridge (not inside) to maintain that ideal warmth without risking overheating.
Light Transition Strategy: The shift from indirect to direct light in Step 4 is where many growers stumble. Instead of moving seedlings to full sun abruptly, I recommend a gradual transition over 3-4 days. Start with 2 hours of morning sun, then increase by 30 minutes daily. This hardening process prevents the "sunburn shock" that causes pale, leggy seedlings. Watch for the first true leaves—they should appear dark green and sturdy, not yellowed or curled. If you notice wilting, it’s a sign you’ve moved too quickly to direct light.
Pro Tips for Morning Glory Seed Germination
- These little-known tricks will help you bypass common pitfalls and get those morning glory seeds sprouting like clockwork.
- Pod Harvesting Precision: When harvesting those deep brown pods, focus on the seam where they naturally split.
- Soaking Science: The 12-24 hour soak isn't just about softening those tough seed coats—it's also a mold-prevention strategy.
Frequently asked questions
Got questions about germinating morning glory seeds? You’re not alone! Here are some of the most common queries—and their answers—to help you succeed with your zero-waste, twist-free harvest.
How long does it take for morning glory seeds to germinate?
Morning glory seeds typically sprout within 7 to 21 days, depending on temperature and moisture. Keep the soil consistently damp (not soggy) and warm (around 70–85°F) for the fastest results. Patience is key—some varieties may take longer, especially in cooler conditions.
Can I germinate morning glory seeds indoors before transplanting?
Yes! Start seeds indoors 4–6 weeks before your last frost date for a head start. Use small pots or seed trays with well-draining soil, and place them near a sunny window or under grow lights. Once seedlings have 2–3 true leaves, they’re ready to harden off and transplant outdoors.
What’s the best way to speed up germination?
Try these pro tips:
- Soak seeds overnight in warm water to soften the hard outer shell.
- Use a heat mat (75–85°F) to mimic natural warmth.
- Avoid overwatering—keep soil moist but not waterlogged.
Why aren’t my morning glory seeds sprouting?
Common culprits include:
- Cold soil: Morning glories thrive in warmth—wait until nighttime temps stay above 50°F.
- Poor moisture: Inconsistent watering can stall germination. Use a spray bottle to mist seeds daily.
- Old or low-quality seeds: Test viability by soaking seeds in water—floaters are likely nonviable.
Are morning glory seeds toxic to pets or humans?
While morning glory seeds are non-toxic to humans and pets, the vines and leaves contain mild toxins (like lyergic acid amide) that can cause nausea if ingested in large amounts. Keep plants out of reach of curious pets or children. Always harvest seeds from organic, pesticide-free plants for safety.
Wrapping up and next steps
Growing morning glory seeds from twist-free pods is a rewarding and sustainable way to cultivate these stunning vines—without waste! By following the right germination techniques, you’ll enjoy vibrant blooms while minimizing environmental impact. 🌱
Now that you’re armed with the knowledge, why not give it a try? Start with a small batch of pods, experiment with your setup, and soon you’ll be harvesting seeds effortlessly. Happy gardening—your future morning glory vines will thank you! 🌸