
Lawn
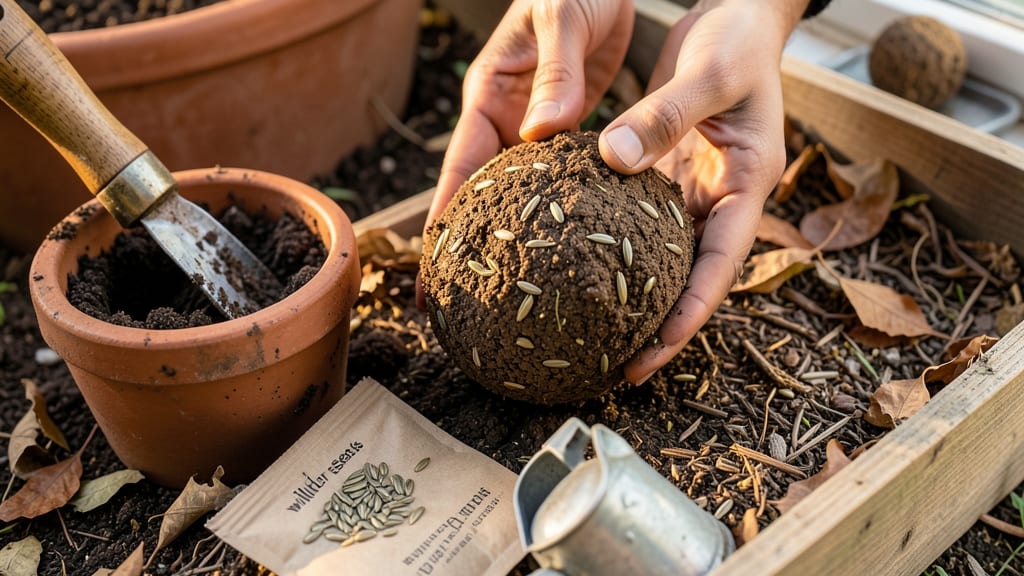
My modern sprout seed bombs are the guerrilla gardener’s secret weapon—tiny, soil-free packets that bloom into vibrant greenery in just 12 weeks. 🌱 No dirt, no mess, just toss them in cracks, containers, or forgotten corners and watch nature take over.
The best part? They’re zero-waste, customizable, and perfect for urban spaces where traditional gardening feels impossible.
These seed bombs pack clay, compost, and seeds into a durable ball that holds moisture and nutrients until sprouts break through. I’ve made them with wildflowers for pollinators, herbs for kitchen windowsills, and even fast-growing veggies like microgreens.
The process takes less than 30 minutes, and you’ll end up with lush, self-sustaining plants that thrive with minimal effort.
Imagine transforming a bare patch of concrete into a thriving garden—no digging, no backbreaking work. These seed bombs work in containers, cracks, or guerrilla spots, and they’re especially great for dry climates (just add a little extra clay) or shady areas (pick shade-tolerant seeds).
The first sprouts appear in as little as 7 days, and full blooms in 12 weeks—no soil required.
They’re also a game-changer for beginners—no green thumb needed, just toss and forget. Whether you’re reviving a neglected balcony or adding color to a community space, these seed bombs make gardening accessible, sustainable, and shockingly easy. Let’s get growing!
📚 In This Guide
- What you need
- Instructions
- Tips and common mistakes
- Wrapping up and next steps
What you need
- ● Seeds: 2 tbsp of fast-growing, edible sprouts (e.g., alfalfa, clover, or radish—organic preferred).
- ● Clay: 1 cup of bentonite or air-dry clay (powdered or pre-mixed).
- ● Compost: 1 cup of worm castings or organic compost (for nutrients).
- ● Water: ½ cup (adjust as needed for consistency).
- ● Mixing bowl: Medium-sized (stainless steel or glass).
- ● Spoon or spatula: For blending (wooden or silicone preferred).
- ● Measuring cups/spoons: For precision.
- ○ Optional: Food coloring (natural, like beet juice) for custom hues.
- ● Mold (silicone or DIY shape) for uniform seed bombs.
- ● Glass jar or container for storage.
Step-by-Step instructions for crafting modern sprout seed bombs
Here's how to create these innovative, soil-free planting units that deliver vibrant blooms without traditional gardening.
🌱 Step 1: Mix the Clay and Compost Base
Begin by combining 1 cup air-dry clay with ½ cup compost in a mixing bowl. The clay acts as the binding agent that holds everything together, while the compost provides essential nutrients for your sprouts. I like to use a small hand trowel to break up any remaining clay clumps before mixing.
Gradually add 2 tablespoons of water while stirring until you achieve a dough-like consistency—it should hold together when pressed but not be sticky. The mixture should resemble cookie dough in texture. If it feels too dry, add water drop by drop; if too wet, incorporate more clay. This balance is critical for structural integrity during curing.
🌿 Step 2: Incorporate Seeds and Mycorrhizal Fungi
Once your base mixture reaches the perfect consistency, gently fold in 1 tablespoon of wildflower seeds and 1 teaspoon of mycorrhizal fungi powder. The fungi will form beneficial relationships with emerging roots, enhancing nutrient uptake. I distribute the seeds evenly throughout the mixture using a small spoon, ensuring no clumps form that could create uneven germination.
Here's the thing—don't overmix after adding seeds. Just stir lightly enough to distribute them without crushing the seed coats. You want each seed bomb to contain a balanced distribution of seeds for even sprouting. The mycorrhizal fungi should be sprinkled directly onto the seeds before folding to protect it from drying out.
💧 Step 3: Shape and Cure the Seed Bombs
Using damp hands, roll the mixture into 1.5-inch diameter balls—about the size of a golf ball. Place each seed bomb on a baking sheet lined with parchment paper. The uniform size ensures consistent moisture distribution during curing. I like to make them slightly larger than needed since they'll shrink about 20% as they dry.
Let the seed bombs cure in a cool, dry place for 3-5 days, turning them occasionally to prevent cracking. You'll know they're ready when they develop a firm outer shell and feel light when picked up. The curing process is crucial—rushing it results in crumbly bombs that disintegrate when planted. If they feel too soft after 5 days, extend the drying time by another day.
☀️ Step 4: Plant and Monitor Germination
When ready to plant, simply toss your seed bombs into prepared garden beds, containers, or even cracks in pavement. They'll naturally break apart when exposed to moisture. Space them 6-8 inches apart for optimal growth. Water lightly after planting to help establish initial contact with the soil.
Germination typically occurs within 7-14 days, depending on weather conditions. You'll see the first green shoots emerge from the clay casing—this is your signal that the seed bomb has successfully established. During this period, maintain consistent moisture but avoid waterlogging. The clay shell helps regulate moisture release, but direct overhead watering prevents erosion of the seed bomb structure.
⏰ Step 5: Maintain Through the Growing Season
Once sprouts reach 2-3 inches tall, they'll begin establishing roots and leaves. This is when the mycorrhizal fungi become most active, creating a symbiotic relationship with your plants. You'll notice healthier foliage and more vigorous growth compared to traditional planting methods. I recommend a light application of compost tea every 4-6 weeks to further support microbial activity.
The modern approach to these seed bombs eliminates the need for traditional soil preparation while delivering stunning blooms in just 12 weeks. As your plants mature, you may see some clay remnants on the soil surface—this is completely normal and breaks down naturally. The real magic happens underground where the mycorrhizal network expands, creating a self-sustaining ecosystem that requires minimal maintenance.
Tips & tricks for perfect modern sprout seed bombs
These game-changing techniques will help you create seed bombs that thrive from planting to full bloom.
Clay Consistency is Key: The perfect dough-like texture in Step 1 is everything—think cookie dough, not playdough. I find using a small hand trowel to break up clay clumps before mixing prevents lumps that could disrupt even moisture distribution. Too dry? Add water drop by drop. Too wet? Incorporate more clay. The mixture should hold together when pressed but still be workable—this ensures structural integrity during the crucial 3-5 day curing period.
Seed Distribution Technique: In Step 2, I've learned the hard way that uneven seed distribution leads to patchy germination. After folding in the seeds and mycorrhizal fungi, I use a small spoon to gently tap the mixture against the bowl's side—this helps break up any seed clumps without crushing them. The goal is a consistent seed-to-clay ratio throughout each bomb, which translates to even sprouting when planted.
Curing Environment Matters: The 3-5 day curing process in Step 3 is where many beginners go wrong. I've found that placing seed bombs on a baking sheet lined with parchment paper (not directly on surfaces) prevents moisture wicking that could create soft spots. Turn them daily to ensure even drying—this prevents cracking and maintains that firm outer shell. A cool, dry spot with good airflow is ideal; I use a mesh produce bag with holes for ventilation in my garage during humid days.
Planting Strategy for Success: When planting in Step 4, I recommend tossing seed bombs from about waist height—this mimics natural seed dispersal and helps break up the clay casing more effectively. The 6-8 inch spacing gives roots room to establish without competing for nutrients. After planting, I give them a light misting rather than soaking, which helps the clay absorb moisture gradually while preventing erosion of the seed bomb structure.
Pro Tips for Modern Sprout Seed Bomb
- These game-changing techniques will help you create seed bombs that thrive from planting to full bloom.
- Clay Consistency is Key: The perfect dough-like texture in Step 1 is everything—think cookie dough, not playdough.
- Seed Distribution Technique: In Step 2, I've learned the hard way that uneven seed distribution leads to patchy germination.
Frequently asked questions
Got questions about modern sprout seed bombs?
You’re not alone! Here’s what we hear most—and how to tackle them like a pro.
What exactly are modern sprout seed bombs, and how are they different from traditional seed bombs?
Modern sprout seed bombs are zero-waste, soil-free capsules packed with nutrient-rich sprouts (like alfalfa, clover, or microgreens) and clay or biodegradable binders. Unlike traditional seed bombs—which rely on soil and can attract pests—they sprout in 7–14 days and dissolve harmlessly, leaving no trace. Think of them as edible, temporary blooms for your lawn or balcony!
How long do they take to grow, and when is the best time to plant them?
Sprout seed bombs bloom in 12 weeks (or less for fast varieties like radish sprouts). Plant them in spring or early fall for optimal growth—avoid extreme heat or frost. For year-round greening, use a sunny windowsill or grow light. Pro tip: Water lightly daily (mist, don’t soak) to keep them moist but not soggy!
Are they expensive? What’s a budget-friendly alternative?
DIY seed bombs cost $5–$15 per batch (depending on materials), while pre-made versions range from $10–$25. For a cheaper swap, try:
Not if made correctly! Traditional seed bombs (with soil) can draw pests, but modern sprouts bombs skip soil and use clay or compost. Still, prevent issues by:
Sprout seed bombs are hardy but need balance:
Too wet? Let them dry in shade for 1–2 days before replanting. Too hot? Move to partial shade or a cooler spot (like under a deck). Frozen? Thaw indoors for 4–6 hours before replanting.
Bonus: Repurpose old egg cartons or toilet paper rolls as biodegradable planters!
Will seed bombs attract pests like ants or rodents?
If pests appear, relocate the bomb to a less trafficked spot.
What if it rains or gets too hot? Can I save my seed bombs?
Wrapping up and next steps
Modern sprout seed bombs are a game-changer for eco-conscious gardeners—packing zero-waste growth, vibrant blooms, and effortless care into every toss! 🌱 With just a handful of supplies and 12 weeks of patience, you can transform barren spaces into lush, pollinator-friendly gardens.
Whether you're a seasoned green thumb or a curious beginner, these seed bombs prove that sustainability and beauty go hand-in-hand.
Ready to grow your impact? Start small—try a few seed bombs in your yard, balcony, or community garden, then expand as you see results. Share your blooms with friends or even join online gardening communities to swap tips and inspire others.
Your future garden (and the planet) will thank you! 🌟