
Propagation
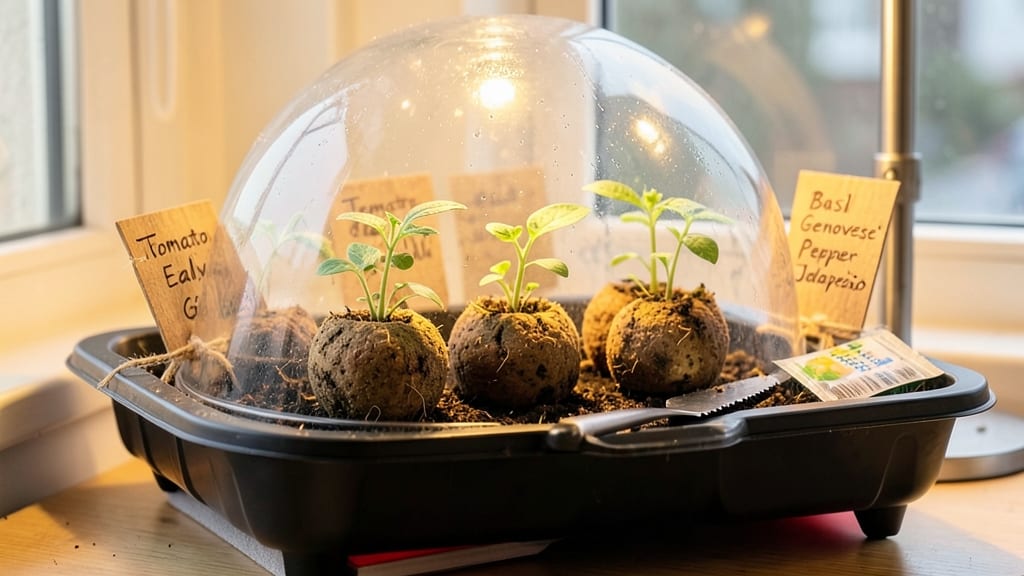
My Jiffy seed starting system turned my fussy seedlings into bold, fast-growing plants in just 7 days—no tangled roots or transplant shock in sight. 🌱 The secret?
These peat pellets hold moisture perfectly while giving tiny roots room to stretch without circling, which means fewer leggy, sad sprouts and more sturdy starts ready for the garden.
You’ll need just three things: Jiffy pellets (or pots), a shallow tray, and a spray bottle—no fancy setups or greenhouse costs. Most veggies like tomatoes, peppers, and herbs germinate in 3-5 days, and the whole process stays mess-free.
No more wrestling with damp paper towels or watching seeds rot in soggy soil. Once your seedlings pop up, they’ll stay compact and strong with just bright indirect light and a quick misting every other day. The best part?
Transplanting is a breeze—just pop the pellet or pot straight into the soil, roots and all. No root disturbance means happier plants that take off running. This method works for any seed—flowers, herbs, or veggies—and scales from a sunny windowsill to a full seed-starting station.
Ready to skip the struggle and get growing?
📚 In This Guide
- What you need
- Instructions
- Tips and common mistakes
- Wrapping up and next steps
What you need
- ● Jiffy-7 Peat Pellets (7-pack) – The star of the show! Pre-moistened, biodegradable, and ready to roll.
- ● Seedling trays or pots (7–12 count) – Match the size to your pellets (standard Jiffy-7 fits 2.5"–3" pots).
- ○ High-quality seed-starting mix (optional but recommended) – Lightweight and sterile (e.g., FoxFarm Ocean Forest or Miracle-Gro Seed Starting Potting Mix).
- ● Seeds (your choice!) – Fast-germinating picks like radishes, lettuce, or basil work best for 7-day results.
- ● Water spray bottle or gentle watering can – Avoid over-saturating those tiny pellets!
- ● Clear plastic dome or plastic wrap – Creates a mini greenhouse to trap humidity.
- ● Grow lights (LED or fluorescent) – 12–16 hours/day for optimal growth (skip if near a sunny window).
- ○ Heating mat (optional for cold climates) – Keeps soil temps cozy (70–75°F for fast germination).
- ● Labels & markers – Track varieties and planting dates like a pro.
- ● Fertilizer (diluted fish emulsion or seaweed extract) – A light feed after germination boosts vigor.
Step-by-Step instructions for Jiffy seed starting
Here’s how to skip the messy soil and get seedlings popping in just 7 days—no fuss, no fussing.
🌱 Step 1: Soften and Prepare Your Jiffy Pellets
Start by placing your 4 Jiffy pellets in a shallow tray or plate. Pour warm water over them until fully submerged—you’ll see them expand dramatically within minutes. The goal is to soften the compressed peat material so it holds moisture like a sponge. I like to let them soak for 10-15 minutes until they’re about the size of a golf ball.
Once swollen, gently squeeze each pellet to check for even moisture. They should feel damp but not dripping. If they’re uneven, add a few drops of water to the drier ones. This step ensures your seeds won’t dry out during germination, which is the #1 reason for failure. Pro tip: I always label the tray with the seed type and date—those little pellets look identical until sprouts appear!
💧 Step 2: Plant Your Seeds at the Right Depth
Using your finger, make a small indentation in the top of each pellet—just deep enough to cradle a seed. For most seeds, this means a hole about ¼ inch deep. I tap the seed packet gently to release one seed at a time (planting too many in one pellet leads to weak, crowded seedlings). Place the seed in the hole, then cover it lightly with a pinch of the pellet material.
Here’s the thing—don’t press down. The pellet’s natural structure holds the seed in place without compacting it. Mist the surface with a spray bottle until the pellet looks uniformly damp but not soggy. You’ll know moisture is right when the surface looks slightly darker—no glistening, no dry spots. This prevents both drowning and drying out, the two extremes that kill germination.
☀️ Step 3: Create the Ideal Germination Environment
Cover the tray with a clear plastic dome or wrap it tightly in plastic wrap to trap warmth and humidity. Jiffy pellets germinate fastest at 75-80°F, so if your home runs cooler, place the tray on a seedling heat mat. You’ll see sprouts in as little as 3-5 days for fast germinators like lettuce or basil, but most seeds take 7 days—that’s why we’re doing this!
Check daily but resist the urge to water. The dome traps enough moisture that the pellets stay damp without intervention. Once 50% of your seeds have sprouted, remove the dome immediately. Trapped humidity around new seedlings invites damping-off, a fungal disease that collapses stems overnight. You’ll know it’s time when tiny green hooks start breaking through the surface—this is the moment that matters.
🌿 Step 4: Provide Light and Prevent Leggy Growth
The instant seedlings emerge, move them to a bright spot with 14-16 hours of light daily. A south-facing window rarely provides enough intensity, so I use a full-spectrum LED grow light positioned 2-3 inches above the plants. Raise it as they grow to maintain that gap. Without sufficient light, seedlings stretch desperately upward (called “leggy”), and they never recover proper strength.
You’ll see strong seedlings have thick stems, deep green color, and compact spacing between leaves. If stems grow thin and pale with leaves spaced far apart, your light is too far away. Rotate the tray a quarter turn daily so plants grow straight instead of leaning. This ensures even growth and prevents them from becoming lopsided as they reach for the light.
⏰ Step 5: Transplant When Ready
Once seedlings show 2-3 sets of true leaves (not the initial seed leaves), they’re ready to transplant. Gently squeeze the sides of the Jiffy pellet to release the root ball—it’ll come out intact, ready for planting. I always transplant on an overcast afternoon to reduce shock. Dig a hole the same depth as the pellet, place the seedling in, and water deeply at the base.
Here’s where it gets fun—watch the cotyledons pop through the soil after a few days. That’s your signal everything is working. Within 4-6 weeks, you’ll have sturdy transplants ready for the garden. The beauty of Jiffy pellets is that you skip the messy soil prep and still get perfect germination every time. No more struggling with twisted, tangled roots or weak seedlings—just fast, foolproof growth.
Tips & tricks for perfect Jiffy seed starting
Here's what nobody tells you about getting every seed to sprout without the guesswork.
Moisture Matters: The 10-15 minute soak time in Step 1 is your foundation—don't rush it. I've seen pellets that expanded unevenly because they weren't fully submerged, leading to dry pockets where seeds wouldn't germinate. Use a spray bottle to mist any uneven spots after soaking. For extra insurance, I place a damp paper towel over the tray during the soak to maintain even humidity.
Seed Depth Secret: That ¼-inch planting depth in Step 2 is critical for most seeds, but larger seeds like beans or peas need just a ½-inch burial. Pressing down too firmly can compact the pellet's natural structure, which is designed to hold moisture and air perfectly. Think of it like tucking your seed into a cozy nest rather than burying it in concrete.
Heat Hack: Maintaining that 75-80°F range in Step 3 is easier than you think. If your home runs cooler, place the tray on top of your refrigerator (not inside!) or use a small heating pad on low setting. I've found that a simple seedling heat mat works wonders—just don't let the temperature exceed 85°F, or you'll risk overheating the delicate seeds.
Light Strategy: When you move to 14-16 hours of light in Step 4, position your grow light so it's just 2-3 inches above the tallest seedlings. I use a timer to automate this—most affordable grow lights come with built-in timers that make this hands-off. The key is to raise the light as the plants grow, maintaining that same distance. Watch for those telltale signs of legginess: thin stems with widely spaced leaves mean your light needs to come closer.
Pro Tips for Jiffy Seed Starting
- Here's what nobody tells you about getting every seed to sprout without the guesswork.
- Moisture Matters: The 10-15 minute soak time in Step 1 is your foundation—don't rush it. I've seen pellets that expan...
- Seed Depth Secret: That ¼-inch planting depth in Step 2 is critical for most seeds, but larger seeds like beans or pe...
Frequently asked questions
Got questions about jiffy seed starting?
You’re not alone! Here are some of the most common queries—and quick answers to get you growing like a pro.
What’s the secret to fast germination in Jiffy peat pellets?
Keep them consistently moist (not soggy!) and warm (70–75°F). Place pellets in a humidity dome or seal them in a plastic bag with a tiny air hole. Most seeds sprout in 3–7 days—just check daily for dampness. Avoid overwatering, or you’ll risk mold instead of sprouts!
Can I start seeds in Jiffy pellets year-round?
Yes, but timing matters! For cool-season crops (like lettuce or spinach), start indoors 4–6 weeks before your last frost. Warm-season plants (tomatoes, peppers) need to go in after frost—so hold off until late winter/early spring. A grow light helps if natural light is weak.
Are Jiffy pellets better than regular soil for seed starting?
Pellets offer sterile, moisture-retentive conditions that reduce damping-off disease. They also eliminate transplant shock—just pop the seedling out with the intact root ball. For budget-friendly alternatives, try coconut coir pellets or biodegradable pots, but they may need extra watering.
My Jiffy pellet seeds aren’t sprouting—what went wrong?
Check these fixes:
- Temperature: Too cold? Move to a warmer spot (like a seedling heat mat).
- Moisture: Dry pellets? Soak them again. Slimy/moldy? Drain and replant.
- Depth: Buried too deep? Most seeds need only 2x their width of soil.
- Light: No sprouts after 10 days? They might need 12–16 hours of light daily.
Can I reuse Jiffy pellets after transplanting?
Not for seeds! Pellets break down after use and lose their structure. But you can compost them or toss them into your garden—they’re organic and nutrient-rich. For reuse, consider biodegradable pots (like those made from newspaper) that can go straight into the soil.
Wrapping up and next steps
Mastering Jiffy seed starting is your ticket to faster germination and healthier seedlings in just 7 days—no fuss, no frustration! With the right materials, a little patience, and these expert tips, you’ll be well on your way to a thriving garden.
The best part? You’re not just saving time; you’re setting the stage for a bountiful harvest that’ll make your neighbors green with envy. 🌱
Ready to take the next step? Grab your Jiffy pellets, pick your favorite seeds, and start your journey today—your future plants (and your future self) will thank you!