
Planting
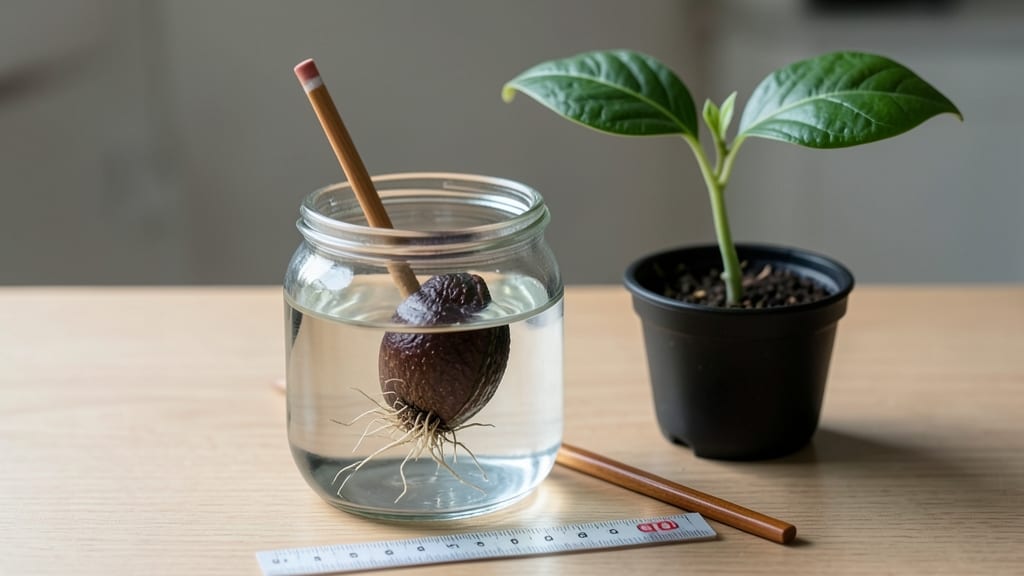
Planting an avocado seed in water feels like magic—turning grocery-store scraps into a tiny green future. 🌱 I’ve watched seeds sprout roots in just a few weeks, and the process is simpler than you’d think, though it won’t grow into a fruit-bearing tree.
The key is patience, a glass of water, and a little toothpick creativity.
You only need three things: a fresh avocado pit, a glass of water, and a few toothpicks or skewers. The pit stays submerged just enough to keep the bottom damp, while the top stays dry to prevent rot.
Most seeds start showing roots in 2-6 weeks, depending on the pit’s health and your home’s warmth.
Once roots hit 2-3 inches, you’ll transition to soil, but the real reward is seeing that first shoot push through the pit. The scent of damp soil and the sight of new growth make every waiting week worth it—even if your tree stays small and decorative.
This method works year-round, but colder months slow growth. If mold appears, rinse the pit and refresh the water. The experiment might not yield fruit, but the lesson in patience and curiosity? That’s priceless.
📚 In This Guide
- What you need
- Instructions
- Tips and common mistakes
- Wrapping up and next steps
What you need
- ● 1 fresh avocado pit – Choose a seed from a ripe, organic avocado (the fresher, the better!).
- ● 3–4 toothpicks or small wooden skewers – For suspending the seed in water.
- ● 1 small glass or jar – A clear container (8–12 oz) with a wide enough mouth to fit the seed.
- ● Room-temperature water – Filtered or tap water (chlorine-free if possible). Change it every 2–3 days.
- ● Patience & sunlight – A bright, indirect-light spot (like a windowsill) and time—roots can take 2–6 weeks to sprout!
- ○ Food coloring (optional) – Adds fun to the water (non-toxic, plant-safe dyes only!).
- ● Small pebbles or marbles – Place at the bottom of the jar to stabilize the seed.
- ● Humidity dome or plastic wrap – Helps maintain moisture if your home is dry.
- ● Journal or ruler – Track root growth progress (because watching it sprout is so satisfying!).
Step-by-Step guide to growing an avocado tree from a seed
Here's how to turn that grocery store pit into a thriving houseplant—no green thumb required.
🌱 Step 1: Clean and Prepare the Seed
Rinse the avocado seed thoroughly under cool water to remove any remaining fruit residue. I scrub it gently with a soft brush—this prevents mold from forming later. Pat it dry with a paper towel and let it air dry for about 1 hour.
Look for the small dimple at one end of the seed. This is the top where the stem will emerge. The opposite end is the root side. If you're unsure, soak the seed in water for 10 minutes—the dimple will absorb water first, making it easier to identify.
💧 Step 2: Insert Toothpicks and Suspend the Seed
Place 3 toothpicks around the seed, spaced evenly about ½ inch apart. Push them in just enough to hold the seed steady but not pierce the skin. The toothpicks should be positioned so the seed hovers 2-3 inches above your glass or jar.
Fill a glass or jar with 4-6 inches of water—enough to cover about 1 inch of the seed's bottom half. The water level should stay just below the dimpled top. Place the suspended seed over the glass so the bottom half sits in the water, and the top half stays dry.
☀️ Step 3: Position for Consistent Light and Moisture
Set your avocado seed in a spot with bright, indirect light. A kitchen windowsill facing east or west works perfectly. Direct sunlight will scorch the seed, while too little light slows growth. You'll know it's getting enough light when the seed develops a slight green tint after a few weeks.
Change the water every 2-3 days to prevent bacteria buildup. The water should always cover about ½ inch of the seed, but never submerge the entire seed. You'll notice tiny roots emerging from the bottom within 2-4 weeks—this is your first sign of success.
🌿 Step 4: Wait for Root and Stem Growth
Once roots reach about 2-3 inches long, you'll see a small sprout emerging from the dimpled top. This can take 4-8 weeks, depending on temperature and light. I keep mine in a warm spot (70-75°F) to speed things up—roots grow faster in cozy conditions.
When the sprout reaches about 3-4 inches tall, it's ready for the next step. The seed will start to soften and split open naturally as the plant grows. Don't rush this—wait until the sprout is sturdy and the roots are thick before transplanting.
🪴 Step 5: Transplant to Soil (When Ready)
Once your avocado seedling has both roots and a 3-4 inch stem, it's time to plant it in soil. Fill a 6-inch pot with well-draining potting mix (avoid garden soil—it stays too wet). Make a small hole in the center and gently place the seedling in, covering the roots completely but leaving the top half exposed.
Water lightly until the soil is moist but not soggy. Place the pot in bright, indirect light and keep the soil consistently moist (not waterlogged). You'll see new leaves emerge within a few weeks—that's your signal everything is working. Be patient—avocado trees grow slowly but can live for decades with proper care!
Tips & tricks for growing avocado trees from seeds
Here's what I learned the hard way after trying this with three different seeds—these little details make all the difference.
Seed Prep Matters: That 1-hour drying time in Step 1 isn't just about removing moisture—it's about preventing mold. I skipped this once and ended up with a fuzzy seed after a week. If you're impatient, use a paper towel to pat it completely dry, then let it sit uncovered for at least 30 minutes in a warm spot. The seed should feel cool to the touch when ready.
Toothpick Placement Technique: The ½-inch spacing between toothpicks in Step 2 is crucial—too close and they'll pierce the skin, too far and the seed won't stay stable. I use wooden toothpicks because they're less likely to break than plastic ones. Push them in at a slight angle so they can support the seed's weight without digging in too deep.
Water Level Watch: That ½-inch water coverage in Step 3 is a sweet spot—any more and the seed will rot, any less and roots won't develop properly. I mark my glass with a permanent marker to track the water level. If you notice brown water after 2-3 days, it's time to change it immediately—this prevents bacterial growth that can stunt root development.
Lighting Secret: The slight green tint you'll see after a few weeks in Step 3 is your plant's way of saying "I'm happy!" If your seed stays brown, move it closer to the light source. I use a grow light on a timer for 12 hours a day in winter months—it makes a noticeable difference in growth speed. Just keep it 6-12 inches away to avoid scorching.
Pro Tips for Plant An Avocado Seed In Water
- Here's what I learned the hard way after trying this with three different seeds—these little details make all the difference.
- Seed Prep Matters: That 1-hour drying time in Step 1 isn't just about removing moisture—it's about preventing mold.
- Toothpick Placement Technique: The ½-inch spacing between toothpicks in Step 2 is crucial—too close and they'll pierce the skin, too far and the seed won't stay stable.
Frequently asked questions
Got questions about growing your avocado seed in water? You’re not alone!
Here are some of the most common queries—and their answers—to help you avoid pitfalls and boost your chances of success.
How long does it take for an avocado seed to sprout roots in water?
Patience is key! Most avocado seeds start developing roots in 2–6 weeks, depending on factors like temperature (ideal: 70–80°F), water quality, and seed freshness. Keep the water changed weekly, and avoid letting it sit stagnant. If nothing happens after 8 weeks, your seed may not be viable—or it could need a little more TLC.
Can I use tap water, or should I use filtered water for my avocado seed?
Tap water is usually fine, but if it’s heavily chlorinated or hard (high in minerals), opt for filtered or distilled water to prevent root damage. Chlorine can be neutralized by letting tap water sit out for 24 hours before use. Avoid using saltwater or overly soft water, as these can stress the seed.
What should I do if my avocado seed starts to rot in water?
Rotting is a common issue—usually caused by bacteria or fungus from stagnant water. If you notice a foul smell, slimy texture, or black/mushy spots, act fast! Remove the seed, trim any mushy roots with a clean knife, and let it dry for 1–2 days before replanting in fresh water. If the seed is too far gone, start with a new one!
How do I know when the avocado seed is ready to transfer to soil?
Wait until you see 2–3 inches of healthy roots and a small shoot (or just roots if it’s root-only growth). At this stage, the seed is strong enough to handle soil. Transfer it gently to a pot with well-draining potting mix, keeping the roots submerged but the top half exposed. Water lightly and place it in bright, indirect light.
Can I grow an avocado tree from a store-bought avocado pit?
Store-bought avocado pits work just like fresh ones—just make sure to choose a ripe, organic avocado (non-organic pits may have been treated to prevent sprouting). Avoid pits from avocados treated with fungicides or preservatives, as these can hinder growth. The process is the same: clean, dry, and plant!
What’s the best temperature for growing an avocado seed in water?
Avocado seeds thrive in warmth (70–80°F or 21–27°C). If your home is cooler, place the jar near a sunny window or use a seedling heat mat (set to 75°F). Avoid drafts or extreme temps—below 60°F can slow growth, while above 90°F may cause stress. A cozy, consistent environment is key!
Wrapping up and next steps
Growing an avocado seed in water is a fun, rewarding project that brings a little green magic into your home! 🌱 With just a few simple steps—patience, a little water, and a sunny spot—you’ve got the perfect chance to nurture a tiny tree.
Whether you’re a beginner or a plant enthusiast, this experiment teaches you the basics of plant care while giving you a unique houseplant to enjoy.
Now that your seedling is sprouting, the next step is to transplant it into soil and watch it thrive! Stay curious, keep learning, and don’t forget to share your progress—your green thumb is growing stronger every day. 🌟