
Propagation
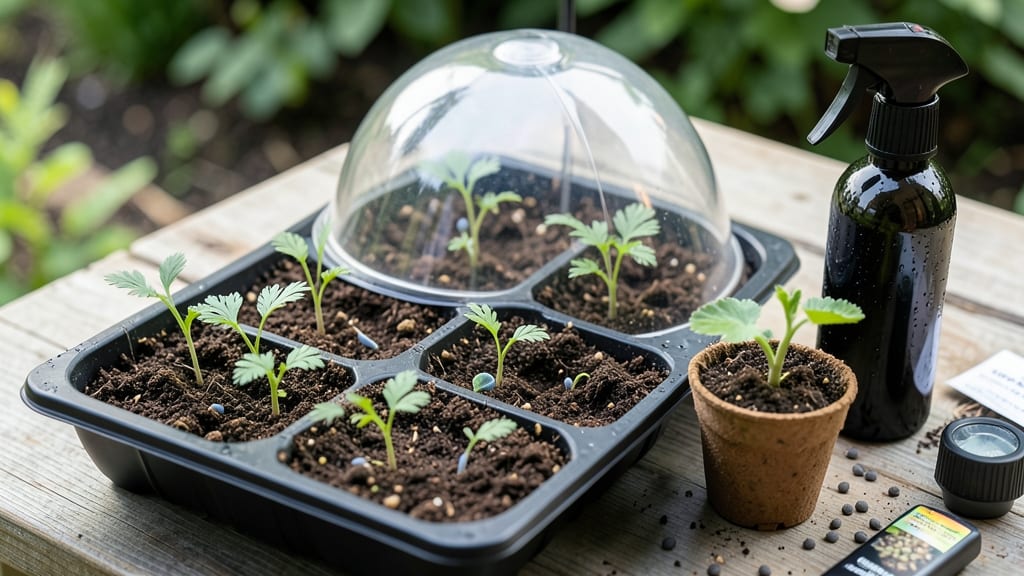
Growing poppies from seed indoors requires a cold-strato start that mimics their natural winter dormancy—skip this step, and you’ll end up with weak, leggy seedlings that flop when transplanted. 🌸 My first attempt failed miserably because I assumed poppies were like petunias, but these finicky beauties need a chilly jolt to break dormancy before they’ll even think about sprouting.
The secret lies in the soil mix and timing: use a light, sandy potting mix, plant seeds just beneath the surface (they need light to germinate), and refrigerate them for 2-4 weeks before moving to a sunny windowsill.
Most varieties need this cold treatment to trigger germination—without it, you might stare at damp soil for months waiting for tiny green spears to appear. Once they sprout, keep them in bright light (a grow light helps if your windowsill is dim) and avoid overwatering—they hate soggy soil.
Within 4-6 weeks, you’ll have sturdy seedlings ready for transplant, their dark green leaves already hinting at the bold blooms to come. This method works for oriental poppies, Iceland poppies, and even California poppies, though some varieties (like the fluffy opium poppy) have slightly different needs.
The key is patience—poppies grow fast once they start, but they demand respect from the very first seed.
📚 In This Guide
- What you need
- Instructions
- Tips and common mistakes
- Wrapping up and next steps
What you need
- ● Poppy seeds: Choose Papaver species (e.g., Papaver somniferum or Papaver rhoeas)—opt for heirloom or organic seeds for best results.
- ● Seed-starting trays or small pots: 2–4-inch pots or a seed tray with individual cells (1–2 seeds per cell).
- ● Seed-starting mix: Lightweight, sterile potting soil (avoid garden soil—it’s too dense!). A 50/50 mix of peat moss and perlite or vermiculite works well.
- ● Grow lights or sunny windowsill: Poppies need 12–16 hours of light daily. A full-spectrum LED grow light (12–15 watts) is ideal if natural light is limited.
- ● Plastic wrap or humidity dome: Keeps moisture in while seeds germinate (critical for tiny poppy seeds!).
- ● Misting bottle or spray nozzle: For gentle watering—poppy seeds hate soggy soil!
- ● Refrigerator (for cold-stratification): A ziplock bag and a paper towel to moisten seeds before chilling.
- ○ Small fan (optional but helpful): Encourages strong stems by simulating airflow.
- ● Heating mat ($10–$20): Speeds up germination if your home runs cool.
- ● pH test kit: Poppies prefer slightly acidic soil (6.0–7.0 pH).
- ● Fertilizer (balanced, 5-5-5 or 10-10-10): Dilute to half-strength once seedlings sprout.
- ● Label markers: Track seed varieties if growing multiple types.
- ● Poppy-specific fertilizer (e.g., fish emulsion): Boosts blooms later in the season.
Step-by-step instructions for growing poppies from seed indoors
Here's how to coax those delicate poppy blooms indoors using a cold-strato method—no fancy equipment needed.
🌱 Step 1: Prepare Seeds with Cold Stratification
Poppy seeds need a cold period to break dormancy. Mix the seeds in a small container with a damp paper towel, then place them in a sealed plastic bag. Store the bag in your refrigerator's crisper drawer for 4-6 weeks—this mimics winter conditions in nature. Check weekly to ensure the towel stays moist but not soggy.
After 4 weeks, remove the seeds and let them sit at room temperature for 2-3 days to wake them up. This stratification trick prevents the common problem of seeds sprouting too slowly or not at all. I like to label the bag with the date so I don't forget when to check them.
🪴 Step 2: Fill Trays with Light, Well-Draining Soil
Use a seed-starting mix in shallow trays or small pots—poppies hate soggy soil. Fill containers to 1 inch below the rim, leaving room for watering. Poppies prefer loose, airy soil that mimics their native meadow habitats. Gently press the mix down with your fingers to remove air pockets without compacting it.
Poppy seeds are tiny, so I like to sprinkle them directly on the soil surface rather than burying them. Lightly press them into the top layer with your thumb—just enough to make contact. A single tray will give you 4-6 poppy plants once they sprout. Water gently with a spray bottle until the soil looks evenly damp.
☀️ Step 3: Provide Warmth and Indirect Light
Place the trays in a warm spot (65-70°F) with bright, indirect light—a south-facing window works well. Poppies won't tolerate direct sun at this stage, or the soil will dry out too quickly. You'll see tiny green shoots in 7-14 days, though some varieties may take longer.
Once sprouts appear, move them to a slightly cooler spot (55-65°F) to prevent leggy growth. If you notice seedlings stretching toward the light, they need more space. Thin them to 2 inches apart using scissors to avoid disturbing roots. Keep the soil lightly moist—never soggy—during this phase.
⏰ Step 4: Harden Off and Transplant Outdoors
After 4-6 weeks, when seedlings have 2-3 sets of true leaves, it's time to harden them off. Start by placing them outside in a sheltered spot for 1 hour daily, gradually increasing exposure over 10-14 days. Poppies are frost-tolerant, so you can transplant them outdoors 2-3 weeks before your last frost date. Choose a sunny spot with well-draining soil.
Dig holes twice as wide as the root ball and space plants 6-12 inches apart, depending on the variety. Water deeply after planting to help roots establish. Mulch lightly with straw to retain moisture and suppress weeds. With proper care, you'll see those iconic poppy blooms in 8-12 weeks—worth every step!
Tips & tricks for growing poppies indoors
Here’s what I’ve learned from growing poppies indoors—these little tricks make all the difference between struggling seedlings and thriving blooms.
Cold Stratification Secret: The 4-6 weeks of cold stratification isn’t just about breaking dormancy—it’s also about preventing mold. I’ve found that placing a small paper towel in the bag with the seeds helps absorb excess moisture while keeping them hydrated. If you notice any fuzzy white spots after a few weeks, that’s mold! Open the bag to air it out for a day before resealing. This step is non-negotiable for poppies—they won’t sprout reliably without it.
Soil Surface Strategy: Poppy seeds are so tiny that pressing them just enough into the soil surface (not burying them) is key. I use my thumb to gently press them into the top layer—this ensures they stay in place while still getting the light they need to germinate. If you accidentally bury them even slightly, they may never emerge. A spray bottle with fine mist works better than watering from above, which can wash seeds away.
Light and Temperature Balance: The 65-70°F range for initial growth might seem narrow, but poppies are sensitive to heat. If your home tends to run warmer, place a small fan nearby to create gentle airflow—this mimics their natural meadow environment. Once sprouts appear, the cooler 55-65°F range prevents leggy growth. I’ve seen seedlings stretch like toothpicks when kept too warm, so don’t skip this adjustment.
Harden Off Gradually: That 1-hour daily outdoor exposure during hardening off might feel slow, but rushing it can shock tender seedlings. Start with just 30 minutes on the first day, then add 15 minutes each subsequent day. Watch for leaves curling or wilting—they’re telling you to slow down. Poppies are surprisingly hardy once established, but their first outdoor experience should be gentle.
Pro Tips for Grow Poppies From Seed Indoors
- Here’s what I’ve learned from growing poppies indoors—these little tricks make all the difference between struggling ...
- Cold Stratification Secret: The 4-6 weeks of cold stratification isn’t just about breaking dormancy—it’s also about p...
- Soil Surface Strategy: Poppy seeds are so tiny that pressing them just enough into the soil surface (not burying them...
Frequently asked questions
Got questions about growing poppies indoors? You’re not alone—these delicate blooms can be tricky! Here are answers to the most common queries to help you succeed with your Papaver seeds.
How long does it take for poppy seeds to germinate indoors?
Poppy seeds typically germinate in 7–14 days when kept in a warm, moist environment (around 70°F). Patience is key—some varieties, like Papaver somniferum, may take longer. Avoid overwatering, which can cause rot. If no sprouts appear after 3 weeks, try a fresh batch of seeds or check for mold.
Do I really need cold stratification for indoor poppy seeds?
Yes! Most poppy seeds require cold stratification (4–6 weeks in the fridge) to break dormancy. Skip this step, and germination rates plummet. For a quick fix, try the "paper towel method": dampen seeds between towels, seal in a bag, and refrigerate. Pro tip: Label your seeds to track stratification dates!
Can I grow poppies indoors without sunlight?
Poppies need 6+ hours of bright light daily—a south-facing window or grow lights are a must. Without enough light, seedlings will grow leggy and weak. If natural light is limited, supplement with a full-spectrum LED (12–16 hours/day). Rotate trays weekly for even growth.
Why are my poppy seedlings dying or turning yellow?
Yellowing leaves or wilting often signal overwatering, poor drainage, or damping-off fungus. Let soil dry slightly between waterings, and use seed-starting mix with perlite. If mold appears, sprinkle cinnamon or hydrogen peroxide (1:10 ratio) on soil. Thin crowded seedlings to 1 inch apart to improve airflow.
What’s the best indoor poppy variety for beginners?
Start with easy-care varieties like Papaver rhoeas (corn poppy) or Papaver nudicaule (Iceland poppy). Avoid tall opium poppies (Papaver somniferum) unless you’re experienced—they’re fussy and may self-seed aggressively. Dwarf varieties (under 12 inches) thrive in containers!
Can I transplant indoor poppy seedlings outside too early?
Wait until after the last frost and when seedlings have 2–3 sets of true leaves. Harden them off by placing outdoors for 1–2 hours daily over 7–10 days. Poppies hate root disturbance, so transplant carefully with a soil block or use biodegradable pots. Choose a spot with well-draining soil—they despise soggy roots!
Wrapping up and next steps
Growing poppies from seed indoors is a rewarding journey that combines patience, a little science, and a dash of creativity! 🌱 With the right cold-stratification technique, proper lighting, and consistent care, you’ll soon be greeted by vibrant blooms that bring joy and color to your space.
Once your seedlings are strong and ready, it’s time to transplant them outdoors—just remember to choose the perfect moment when frost is no longer a threat.
So, roll up your sleeves, gather your supplies, and let your green thumb shine! Whether you’re a seasoned gardener or a curious beginner, every poppy you grow is a step toward a brighter, more beautiful garden. Happy planting—and may your blooms be bold! 🌸