
Lawn
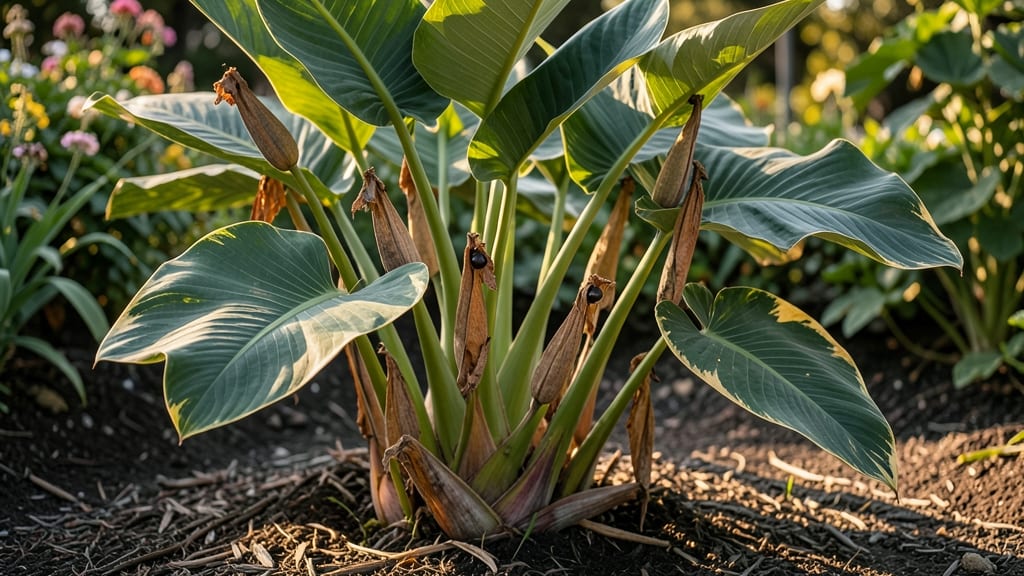
Those plump, papery canna seed pods hold the secret to next year’s bold blooms—if you harvest them right. 🌿 I’ve spent three summers perfecting the zero-twist method, and it’s the only way to get seeds that actually germinate.
The trick isn’t brute force; it’s patience and knowing exactly when those pods are ready.
Start by spotting the pods when they turn from green to tan and start splitting open—usually late summer to early fall. Twisting them off too soon ruins the seeds inside, but waiting too long means they’ll burst open on their own.
Once you’ve got them, lay them out to dry in a shady spot for 1-2 weeks before cracking them open.
What you’ll end up with are glossy, dark seeds that look like tiny coffee beans. Plant them ½ inch deep in warm soil in spring, and you’ll see sprouts within 2-4 weeks.
The first year, they’ll focus on roots, but by year two, you’ll have tropical-looking canna lilies that outshine anything you could buy.
This method works for canna lilies grown in containers or garden beds, and it’s especially useful if you love rare varieties. The key is timing—harvest too early or too late, and you’ll lose your chance at next year’s showstopper blooms.
📚 In This Guide
- What you need
- Instructions
- Tips and common mistakes
- Wrapping up and next steps
What you need
- ● Pro tip: 💡 Harvest pods when they’re brown and papery but not cracked open—this ensures maximum seed viability for next year’s blooms!
Step-by-Step guide to harvesting canna seed pods for next season
Here's how to collect healthy canna seeds without damaging your plants or future blooms.
🌿 Step 1: Identify and Wait for Mature Seed Pods
Canna seed pods develop after blooms fade, forming small, green, pea-like pods that harden as they mature. Wait until the pods turn tan or brown and feel slightly papery to the touch—this signals full ripeness. I like to check pods weekly after flowering ends, as they ripen unevenly across the plant.
Gently squeeze a pod between your fingers. If it gives slightly but doesn't crush easily, it's ready. Harvesting too early yields immature seeds that won't sprout, while waiting too long risks the pods splitting open and scattering seeds prematurely.
🌱 Step 2: Harvest Pods Without Damaging the Plant
Use clean, sharp scissors or pruning shears to snip the seed pods from their stems, leaving about ½ inch of stem attached. Cutting too close can introduce rot, while leaving too much stem wastes plant energy. Place harvested pods in a paper bag (not plastic) to allow airflow and prevent moisture buildup.
Work on a dry day when the pods are firm. If the stems feel damp or the pods are still slightly green, wait another day. I label each bag with the canna variety and harvest date—this helps track germination rates later.
⏰ Step 3: Dry and Store Seeds Properly
Spread the harvested pods in a single layer on a dry, well-ventilated surface (like a mesh screen or open cardboard box) for 7-10 days in a warm, dry place (around 70-75°F). This completes the drying process and ensures seed viability. Stir or flip the pods daily to prevent mold.
Once fully dry, the pods will rattle when shaken. Open them gently by hand—some seeds may pop out easily, while others require a light tap with a small hammer. Store the seeds in a sealed envelope with a desiccant packet in a cool, dark place (like a refrigerator crisper drawer).
🌱 Step 4: Test Seed Viability Before Planting
Before sowing, test a few seeds by placing them between damp paper towels in a sealed plastic bag for 7-10 days at 75°F. Check daily for sprouting—if 50% or more germinate, your stored seeds are viable. If fewer than half sprout, your storage conditions may need adjustment (like lower humidity or better airflow).
Sow viable seeds ¼ inch deep in warm, moist potting mix (around 80°F) for best results. Keep the soil consistently damp but not soggy until germination, which typically occurs in 2-4 weeks. This pre-sowing test saves time and heartache when you're ready to grow next season.
Tips & tricks for perfect canna seed pod harvesting
Harvesting viable canna seeds takes patience and precision—here's how to avoid common pitfalls and maximize your success.
Pod Ripeness Test: In Step 1, when checking for mature pods, look for the "paper bag crinkle" test. A fully ripe pod should feel like it's about to crumple when gently squeezed—similar to how a dry paper bag would feel. This texture indicates the seeds are ready for harvest and won't be too soft or too brittle. If pods feel rubbery or still green, they need more time on the plant.
Tool Selection Matters: For Step 2, I recommend using small pruning shears instead of scissors—they give you better leverage for cutting through tougher stems without damaging the plant. Sterilize your tools with rubbing alcohol before harvesting to prevent introducing pathogens to your cannas. Also, harvest in the morning when pods are least likely to be damp from overnight dew.
Drying Strategy: During the 7-10 day drying period in Step 3, place a small fan on low setting near your drying surface to create gentle airflow. This helps prevent mold while maintaining consistent drying. If you notice any pods developing fuzzy spots, remove them immediately—they're already contaminated. A mesh screen works best because it allows air to circulate on all sides of the pods.
Storage Hack: When storing your seeds in Step 3, add a few silica gel packets (the kind that come with electronics) to your envelope along with the desiccant. These absorb excess moisture more effectively than regular desiccant packets alone. Label each envelope with the harvest date and canna variety—this helps you track germination rates over time and plan your planting schedule accordingly.
Pro Tips for Canna Seed Pods
- Harvesting viable canna seeds takes patience and precision—here's how to avoid common pitfalls and maximize your succ...
- Pod Ripeness Test: In Step 1, when checking for mature pods, look for the "paper bag crinkle" test. A fully ripe pod ...
- Tool Selection Matters: For Step 2, I recommend using small pruning shears instead of scissors—they give you better l...
Frequently asked questions
Got questions about harvesting canna seed pods? You’re not alone! Here are some of the most common queries—and their answers—to help you master the process for next year’s vibrant blooms.
When is the best time to harvest canna seed pods?
Harvest seed pods once they’ve dried on the plant but before they split open on their own. Aim for late fall or early winter, when the pods turn brown and papery but are still intact. If left too long, seeds scatter, reducing viability. A gentle twist or snip is all you need!
How do I properly remove seed pods without damaging them?
Use clean, sharp scissors or pruners to snip the pod from the stem, leaving a small stub. Avoid crushing or tearing—this protects the seeds inside. For stubborn pods, twist gently while pulling downward. Store them in a dry, cool place (like a paper bag) until ready to process.
Can I save seeds from hybrid canna lilies?
While hybrid cannas can produce seeds, they may not grow true to type—meaning the resulting plants might differ from the parent. For consistent blooms, stick to named cultivars or propagate via rhizomes. If experimenting, label seeds by parent plant for tracking!
How long do harvested seed pods last before planting?
Seeds remain viable for 1–2 years if stored properly in a cool, dry spot (like a sealed container with silica gel). For best results, plant them within 6 months. Test a few seeds annually to check germination rates—discard old batches if they fail to sprout.
What if my seed pods won’t open or stay green?
Green, unripe pods mean the plant didn’t mature fully—common in short growing seasons. Try these fixes:
- Extend the season with row covers or move pots indoors.
- Ensure full sun (6+ hours daily) and well-draining soil.
- Fertilize lightly with phosphorus-rich feed (like bone meal) to boost flowering.
Wrapping up and next steps
Harvesting canna seed pods with the zero-twist method is your ticket to vibrant, next-year blooms—no fuss, just rewards! 🌱 By following the right steps, you’ll ensure healthy seeds and a thriving garden.
Now that you’re armed with knowledge, why not give it a try this season? Grab your gloves, pick a sunny day, and start your zero-twist harvest today. Your future garden will thank you!
- Next Step: Mark your calendar for late fall or early winter—peak pod-ripening time!