
Lawn
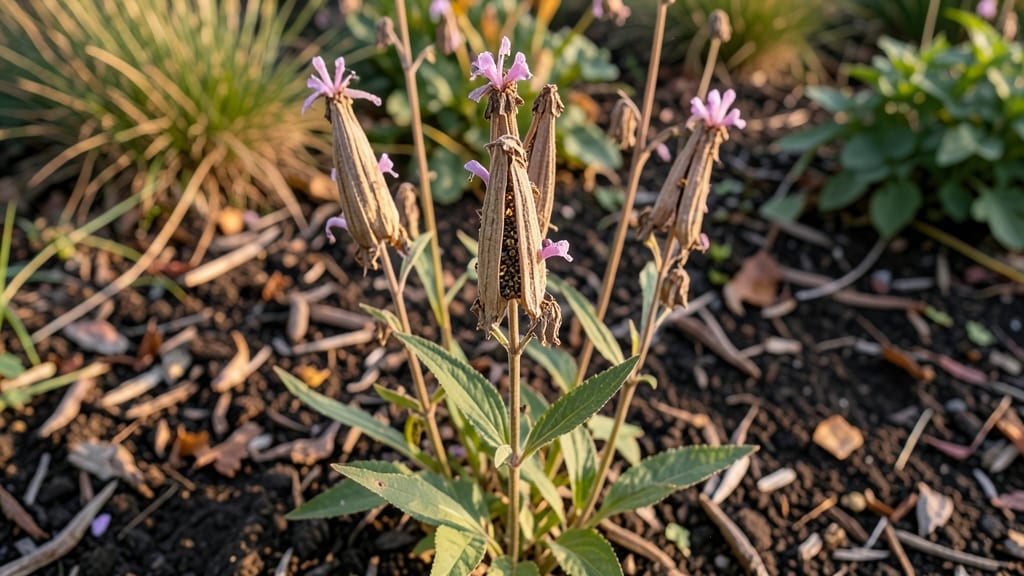
Cold-moist stratification turns bee balm seed pods into next year's vibrant blooms. 🌿 I've struggled with these tricky seeds for years—until I discovered the simple trick that guarantees germination. The key isn't just planting; it's mimicking nature's winter conditions in your own kitchen.
Start by harvesting mature seed pods in late summer when they turn brown and papery. Let them dry completely before storing in a paper bag—this prevents mold while keeping them viable.
The real magic happens when you mix the seeds with damp sand or peat moss and refrigerate them for 6-8 weeks.
What you'll end up with are robust seedlings ready to transplant in early spring. The blooms arrive earlier than store-bought plants, and you get exactly the colors you love. My purple and red varieties now return every year without fail.
This method works for any Monarda variety and adapts to both garden beds and containers. The only requirement is patience—those seedlings take their time but reward you with months of hummingbird visits and fragrant foliage.
📚 In This Guide
- What you need
- Instructions
- Tips and common mistakes
- Wrapping up and next steps
What you need
- ● Bee balm seed pods: Fresh or dried, collected from mature plants (aim for at least 10 pods for a small batch).
- ● Paper towels or coffee filters: 2–3 sheets (unbleached, seed-safe).
- ● Plastic zip-top bags: Quart-sized (2–4 bags, depending on seed volume).
- ● Spray bottle: With water (or a small cup for gentle pouring).
- ● Permanent marker: To label bags with seed type and date.
- ● Refrigerator: With a consistent temperature (ideally 34–40°F).
- ○ Small container or tray: For draining excess water (optional but helpful).
- ● Sand or perlite: A pinch mixed with seeds for better aeration (1:1 ratio with seeds).
- ● Grow lights or sunny windowsill: For post-stratification sprouting checks.
- ● Notebook: To track stratification progress (dates, moisture levels, etc.).
- ● Humidity dome: Clear plastic wrap to retain moisture during germination.
How to cold-moist stratify bee balm seed pods for spring
This trick mimics nature’s winter conditions to break dormancy—here’s how I guarantee germination.
🌱 Step 1: Harvest and Prepare Mature Seed Pods
Collect fully browned seed pods from late summer into fall. Bee balm seeds need full maturity—they won’t germinate if harvested too early. Place pods in a paper bag and let them dry indoors for 3-5 days until they rattle when shaken. This ensures maximum seed viability.
Once dry, gently crush the pods with your fingers or a mortar and pestle to release the tiny, wrinkled seeds. I find a small colander works best—just shake it over a sheet of paper to catch every seed. Store them in an envelope until stratification begins.
❄️ Step 2: Mix Seeds with Moist Growing Medium
Fill a quart-sized zip-top bag with 2 parts peat moss and 1 part perlite—this mimics the moist, aerated conditions of forest floors where bee balm thrives naturally. Spritz the mix until it feels like a damp sponge (not dripping).
Add the seeds—about 1 teaspoon per bag—and seal the bag tightly. Place it in a refrigerator for 4-6 weeks. This cold-moist stratification mimics winter’s chill and moisture, breaking the seed’s dormancy. Check monthly to ensure the mix stays damp; if it dries, spritz lightly again.
☀️ Step 3: Transition to Warmth for Germination
After 4-6 weeks, remove the bag from the fridge and place it in a warm spot (65-75°F)—a sunny windowsill or under a grow light works. Keep the bag sealed but check daily for condensation. If you see mold (fuzzy white growth), open the bag for 24 hours to air out before resealing.
Germination typically starts in 7-14 days. You’ll notice tiny green shoots pushing through the mix—this is your cue to prepare small pots filled with seed-starting mix. Transplant each seedling carefully, burying it to the same depth it was in the bag.
🌿 Step 4: Provide Ideal Growing Conditions
Place seedlings in bright, indirect light for the first week to prevent shock. After that, introduce 4-6 hours of morning sun daily, gradually increasing exposure. Bee balm thrives in partial shade, so avoid harsh afternoon sun until plants are established.
Keep the soil evenly moist but not soggy—stick your finger in the pot up to 1 inch deep. If it feels dry, water gently until moisture reaches the bottom. Fertilize lightly with a balanced liquid fertilizer (10-10-10) once true leaves appear, but avoid overfeeding—bee balm prefers lean soil.
⏰ Step 5: Harden Off and Plant Outdoors
After 4-6 weeks of indoor growth, when seedlings have 3-4 sets of leaves, start hardening them off. Move pots outside for 1-2 hours the first day, gradually increasing time over 10-14 days. Choose a cool, overcast day for the final transplant to reduce stress.
Plant outdoors in well-draining soil with morning sun and afternoon shade. Space plants 18-24 inches apart—bee balm spreads aggressively, so give it room. Mulch with 2 inches of organic matter to retain moisture and suppress weeds. With proper care, you’ll see vibrant blooms by mid-summer.
Tips & tricks for perfect bee balm seed pod stratification
This process is all about patience and precision—here’s how to make every step work for you.
Timing is Everything: In Step 1, don’t rush the drying process. Those 3-5 days are critical for seed viability—if pods aren’t fully brown and rattly, they won’t break dormancy properly. I’ve learned this the hard way: under-dried pods yield weak germination. Place them in a warm, dry spot (like a sunny windowsill) to speed things up slightly if needed, but don’t exceed the 5-day maximum.
The Moisture Balance: During Step 2, the 2 parts peat moss to 1 part perlite ratio is non-negotiable—peat holds moisture while perlite prevents suffocation. After sealing your bag, give it a gentle squeeze: if water beads form on the outside, it’s too wet. If it feels dry, spritz lightly. This balance mimics forest floor conditions perfectly, and it’s why you’ll see such consistent germination.
Mold Prevention: The 24-hour air-out rule in Step 3 is your safety net against mold. When you see fuzzy white growth, open the bag immediately—even if it means delaying germination by a day. I’ve had bags turn completely moldy because I ignored this step, and it’s a heartbreaking waste of time. Keep a small fan nearby to help dry out the mix if needed.
Light Transition: In Step 4, that bright, indirect light requirement is crucial. Direct sunlight can scorch delicate seedlings, while too little light leads to leggy, weak growth. I use a south-facing window with sheer curtains—it gives just enough light without the intensity. If you don’t have natural light, a grow light on a timer (12-14 hours daily) works wonders.
Pro Tips for Bee Balm Seed Pods
- This process is all about patience and precision—here’s how to make every step work for you.
- Timing is Everything: In Step 1, don’t rush the drying process. Those 3-5 days are critical for seed viability—if pod...
- The Moisture Balance: During Step 2, the 2 parts peat moss to 1 part perlite ratio is non-negotiable—peat holds moist...
Frequently asked questions
Got questions about bee balm seed pods and their cold-moist stratification process? You’re not alone! Here are some of the most common queries—and the answers to help you grow vibrant blooms come spring.
Why won’t my bee balm seeds sprout after stratification?
Even with cold-moist stratification, some seeds may take months (or even a year!) to germinate. Bee balm seeds are notorious for slow germination—patience is key! Ensure your seeds stay moist but not soggy during stratification, and plant them in well-draining soil. If they still refuse to sprout, they may need another round of cold treatment or simply be old seeds.
How long should I stratify bee balm seeds?
Cold-moist stratification for bee balm typically requires 6–8 weeks in the fridge (or outdoors in a protected spot during winter). Some gardeners extend this to 12 weeks for better results. Check your seeds monthly—if they’re still dry or shriveled, give them another 2–4 weeks. Pro tip: Label your containers to avoid mixing up seed varieties!
Can I use regular potting mix instead of a peat-perlite blend for stratification?
While you can use standard potting mix, a peat-perlite or sand-peat mix is ideal because it drains better and prevents mold. If using potting mix, ensure it’s moist but not waterlogged—bee balm seeds rot quickly in soggy conditions. For best results, mix in a little perlite or vermiculite to improve aeration.
Will bee balm seed pods attract more bees than mature plants?
Yes! While mature bee balm plants are bee magnets, seed pods in early spring can also draw pollinators—especially if they’re fresh and intact. However, once pods dry and split open, they release seeds, which may attract foraging bees and ants. If you’re growing bee balm for pollinators, leave some pods on the plant for a steady food source throughout the season.
What’s the best way to store bee balm seeds for next year?
To preserve bee balm seeds for future planting, let them fully dry in a well-ventilated area (like a paper bag with holes) for 1–2 weeks. Once dry, store them in an airtight container (like a glass jar) in a cool, dark place (e.g., fridge). Seeds stay viable for 1–2 years this way—just don’t refrigerate them while they’re still moist!
Wrapping up and next steps
Growing bee balm from seed pods using cold-moist stratification is a rewarding way to bring vibrant blooms to your garden next spring! 🌱 With patience and the right techniques, you’ll unlock the full potential of these hardy perennials.
Now that you’re equipped with the knowledge, why not try it this fall? Grab those seed pods, gather your supplies, and give your garden a head start—your future pollinators will thank you!