
Lawn
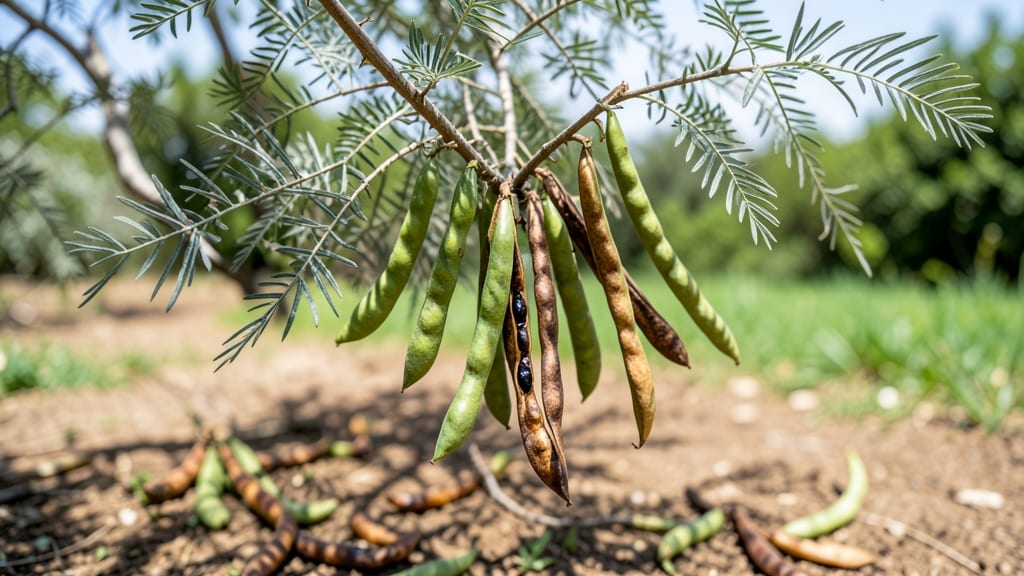
Harvesting acacia seed pods turns brown winter debris into spring's most exciting gardening project. 🌱 The pods dry to a papery texture by late fall—just when most gardeners put tools away—and hiding inside are seeds that can germinate within weeks if you know the trick.
I've learned the hard way that acacia seeds need scarification (a fancy word for "scratching the tough outer shell") to break dormancy. Without it, they'll sit in your seed tray looking stubborn for months. The right technique turns those hard little seeds into fast-growing seedlings that thrive in sunny spots.
Once sprouted, acacia seedlings grow surprisingly fast—3-4 inches in their first month—with delicate fern-like leaves that catch sunlight beautifully. The key is keeping them consistently moist without drowning them, and protecting them from slugs that love young, tender growth.
This method works for Acacia koa (with its iconic golden flowers) and Acacia dealbata (the silver wattle), though timing varies slightly by variety. Let's turn those pods into your next garden success story!
📚 In This Guide
- What you need
- Instructions
- Tips and common mistakes
- Wrapping up and next steps
What you need
- ● Acacia seed pods: Collect 100–200 fresh, mature pods (ensure they’re dry and slightly cracked for easy seed extraction).
- ● Pruning shears or sharp scissors: For harvesting pods safely from branches.
- ● Large bowl or bucket: A sturdy container (1–2 gallons) to collect pods and seeds.
- ● Paper towels or newspaper: For drying seeds (1–2 sheets).
- ○ Small mesh bag or breathable fabric sack: To store seeds until planting (optional but helpful for airflow).
- ● Garden soil or potting mix: Well-draining, nutrient-rich soil (5–10 lbs, depending on planting scale).
- ● Small pots or seedling trays: 3–4 inch pots (6–12 units) for germination.
- ● Spray bottle with water: For gentle seed hydration during germination.
- ● Labeling tags and marker: To track seed varieties and planting dates.
- ● Glove (gardening or work glove): Protects hands from thorns or rough pods.
- ● Mortar and pestle (or rolling pin): For crushing pods to release seeds if needed.
- ○ Sieve or fine mesh screen: Helps separate seeds from chaff (optional but efficient).
- ● Grow lights or sunny windowsill: For indoor germination (if natural light is limited).
- ● Compost or worm castings: Boosts soil fertility for faster growth.
- ● Watering can with fine rose nozzle: For precise watering of seedlings.
Step-by-Step guide to harvesting and preparing acacia seed pods
Harvesting acacia seed pods is simpler than you think—just follow these steps to collect and prepare them for germination.
🌿 Step 1: Identify and Harvest Mature Seed Pods
Look for seed pods that have turned a deep brown or black color and feel dry to the touch—these are ready for collection. I like to harvest them in the late fall or early winter when they’ve fully dried on the tree. Use clean, sharp pruning shears to cut the pods from the branches, leaving a small stem attached.
Collect only fully mature pods—green or partially dried ones won’t produce viable seeds. Place them in a breathable paper bag or mesh sack to allow airflow, which prevents mold. Avoid plastic bags, as trapped moisture can ruin the seeds inside.
🪴 Step 2: Dry and Clean the Seed Pods
Spread the harvested pods in a single layer on a clean, dry surface indoors or in a shaded outdoor area. Let them dry for 3-5 days until they’re completely brittle—you’ll know they’re ready when they shatter easily when squeezed gently. This step ensures any lingering moisture evaporates, preventing rot during storage.
Once fully dry, gently crack open each pod by hand or with a small hammer. Remove the dark, hard seeds inside and discard the empty pod husks. Sift the seeds through a fine mesh strainer to separate any remaining debris or chaff. Store the clean seeds in an airtight container in a cool, dry place.
☀️ Step 3: Test Seed Viability Before Planting
Not all acacia seeds will germinate, so it’s smart to test a few first. Fill a small container with moistened paper towels and place 5-10 seeds between them. Seal the container loosely with plastic wrap and keep it in a warm spot (70-75°F) for 7-10 days. Check daily—viable seeds will sprout within this time.
If fewer than half sprout, your seeds may need stratification (a cold treatment). Place the remaining seeds in a sealed bag with a bit of damp sand, then refrigerate for 4-6 weeks before testing again. This mimics winter conditions and often breaks dormancy for stubborn seeds.
⏰ Step 4: Plant Viable Seeds for Germination
Fill small pots (2-3 inches deep) with a light, well-draining mix (like cactus or succulent soil). Plant seeds ¼ inch deep, spacing them 1 inch apart to avoid overcrowding. Water gently until the soil is evenly moist but not soggy—acacia seeds rot quickly in waterlogged conditions.
Cover the pots with clear plastic wrap or a humidity dome to retain moisture, then place them in bright, indirect light (65-75°F). Germination can take 2-4 weeks, so be patient. Once seedlings emerge, remove the cover and move them to a sunny windowsill or under grow lights for 12-14 hours daily.
🌱 Step 5: Transplant and Care for Young Acacia Seedlings
When seedlings reach 3-4 inches tall and have 2-3 sets of true leaves, they’re ready to transplant. Choose a well-draining soil mix and a pot 6 inches deep with drainage holes. Handle seedlings carefully—their roots are delicate, and transplant shock can stunt growth.
Water lightly after transplanting and keep the soil consistently moist but never waterlogged. Acacia seedlings thrive in full sun and dry conditions, so gradually introduce them to outdoor sunlight over 1-2 weeks before moving them permanently. Prune leggy growth to encourage bushier development.
Tips & tricks for perfect acacia seed pod harvesting
Harvesting acacia seed pods successfully comes down to a few key details that make all the difference between viable seeds and wasted effort. Here's what I've learned from years of working with these unique pods.
Timing is Everything: Harvest pods when they're completely dry and have turned deep brown or black—this usually happens in late fall or early winter. I've made the mistake of harvesting too early, and those pods just didn't produce viable seeds. The pods should feel brittle and easily shatter when squeezed gently. This is your clear signal that the seeds inside are ready for collection.
Storage Wisdom: Once you've cleaned your seeds, store them in an airtight container in a cool, dry place. I like to add a small packet of silica gel to absorb any residual moisture that might cause the seeds to spoil. The key here is maintaining that dry environment—acacia seeds are particularly sensitive to moisture once they're extracted from their pods.
Germination Secret: When testing seed viability in Step 3, keep that temperature between 70-75°F consistently. I've found that using a small heating pad under the container helps maintain this warmth without overheating. The seeds need this stable environment to break dormancy properly. If your kitchen runs cooler, you might need to extend the 7-10 day test period slightly.
Transplanting Technique: Handle those delicate seedlings like they're made of glass when transplanting in Step 5. I've ruined more than a few by being too rough. Use a small spoon or butter knife to gently lift them from their starter pots, being careful not to damage the roots. The goal is to minimize transplant shock so your seedlings can focus all their energy on establishing themselves in their new home.
Pro Tips for Acacia Seed Pods
- Harvesting acacia seed pods successfully comes down to a few key details that make all the difference between viable ...
- Timing is Everything: Harvest pods when they're completely dry and have turned deep brown or black—this usually happe...
- Storage Wisdom: Once you've cleaned your seeds, store them in an airtight container in a cool, dry place. I like to a...
Frequently asked questions
Got questions about harvesting and using acacia seed pods? You’re not alone! Here are some of the most common queries—plus straightforward answers to help you get the most out of your zero-waste gardening adventure.
How do I know when acacia seed pods are ready for harvesting?
Acacia seed pods typically mature between 6 to 12 months after flowering, depending on the species. Look for pods that are dry, brown, and slightly papery—they’ll rattle when shaken (a sign seeds are fully developed). Avoid harvesting if pods are still green or soft, as seeds may not be viable.
Can I harvest acacia seed pods year-round, or is there a best time?
While acacia trees produce pods seasonally, pods often remain on the tree throughout the year in warmer climates. The best time to harvest is late fall to early winter when pods are fully dried. In colder regions, wait until spring when pods are dry but before new growth begins. Timing ensures maximum seed viability!
What can I do with leftover acacia seed pods after extracting seeds?
Don’t toss those empty pods! They’re great for mulch, compost, or even decorative crafts. Crush dried pods into a fine texture for soil enrichment, or use whole pods in terrariums or dried flower arrangements. Just avoid burning them—some acacia species release toxic fumes when burned.
Why are my harvested acacia seeds not germinating? Troubleshooting tips?
If seeds aren’t sprouting, check these common issues:
- Insufficient scarification: Acacia seeds often need a light sandpaper rub or soaking in warm water for 24 hours to break dormancy.
- Poor storage: Store seeds in a cool, dry place—moisture or heat can reduce viability.
- Wrong soil mix: Use a well-draining, sandy mix (acacia seeds hate soggy soil!).
- Patience: Some species take 2–4 weeks to germinate—don’t give up too soon!
Are there non-invasive acacia species I can use for seed pods?
Yes! Opt for native or low-invasive species like Acacia koa (Hawaii), Acacia farnesiana (sweet acacia), or Acacia dealbata (silver wattle). Avoid Acacia mearnsii (black wattle) in regions where it’s considered invasive—always check local regulations before planting. Pro tip: Purchase seeds from reputable suppliers to ensure you’re getting non-invasive varieties.
Wrapping up and next steps
Acacia seed pods offer a sustainable, zero-waste solution for year-round lawn growth—packed with nutrients, easy to harvest, and perfect for eco-conscious gardeners! 🌱 By following the right techniques, you can transform these natural treasures into thriving green spaces without breaking the bank or harming the planet.
Whether you're a beginner or a seasoned gardener, their versatility makes them a game-changer for your outdoor space.
Ready to put your newfound knowledge into action? Start small—try harvesting a few pods this weekend and experiment with different soil mixes or composting methods. Your lawn (and the planet) will thank you! 🌍✨